|
Company
Name |
|
|||
|
Employee
Names |
|
|||
|
Team
Lead |
|
|||
|
Module
Name |
Topologies and Standards |
|||
|
Certification
Test |
|
Vendor |
|
|
|
Objectives
covered |
|
|||
|
Time
allotted |
10 Days |
Time
Taken |
|
|
|
Date
Started |
|
Date
Completed |
|
|
|
Item |
Completed lab |
Answered lab questions |
Completed lab report |
|
Lab reports for all labs (List labs) |
|
|
|
|
3-1 |
|
|
|
|
3-2 |
|
|
|
|
3-3 |
|
|
|
|
3-4 |
|
|
|
|
3-5 |
|
|
|
|
3-6 |
|
|
|
|
Completed solution to problem portfolio |
|||
|
Explanation of the option
of different kinds of topologies, including bus, star, cascading star, token
ring, and mesh. |
|
|
|
|
Explanation of the options
of different types of architectures, including Ethernet, token-ring, ARCNet,
and FDDI) |
|
|
|
|
Access methods used by each
topology. |
|
|
|
|
Suggestion of which
topology would best fit their needs. |
|
|
|
|
Explanation of the option
of different kinds of topologies, including bus, star, cascading star, token
ring, and mesh. |
|
|
|
|
Explanation of the options
of different types of architectures, including Ethernet, token-ring, ARCNet,
and FDDI) |
|
|
|
|
Drawing of the network,
which includes: |
|
|
|
|
All computers on network
(servers and workstations) |
|
|
|
|
Label cable types |
|
|
|
|
Label connector types |
|
|
|
|
Label access speeds |
|
|
|
|
Label access method |
|
|
|
|
Describe topology and
architecture |
|
|
|
Notes!
Moving Data on the Physical Layer
·
It takes more than just a ___________________and ___________________
to transmit data.
·
Different networks use different methods of ___________________.
·
Each of these methods have their pros and cons.*
Three Main Types of Access Methods
·
Contention
·
Polling
·
Token Passing
Contention
·
Any computer can ___________________at any time
·
In other words, ___________________ “make a run for
it” and hope they don’t run into anyone else.
·
If other computers are ___________________at the same
time there could be problems.
·
Used in ___________________LANs*
Two Types of Contention
·
CSMA/CD—Carrier Sensing Multiple ___________________with
Collision ___________________
·
CSMA/CA—Carrier ___________________Multiple Access
with Collision ___________________*
CSMA/CD
·
Used in ___________________LANs
·
Listens to the ___________________as they are
transmitting
·
If a signal is ___________________, transmission stops
·
Good for less busy ___________________.
·
As the network gets busier, the ___________________increase.*
CSMA/CA
·
Used in ___________________ and ___________________LANs
·
___________________before transmitting to ___________________collisions.
·
If a transmission is detected on the network, waits
for a ___________________time period and then listens again.*
Polling
·
___________________around before sending on the network.
·
Polling causes a LOT of ___________________traffic,
which can ___________________down the network.*
Token Passing
nUsed in ___________________ ___________________ LANs
nA frame called a “___________________” is passed around the LAN.
nEach computer must ___________________until it receives the ___________________before it can transmit.*
Token Passing
Networks that use Token
Passing
n___________________Ring--Most common. See ___________________ for information on Token Ring Networks
n___________________802.4—Not used often, but a few still out there
n___________________—Very fast demand priority fiber standard using a
double token ring configuration
Contention vs
Token
nGood
for ___________________usage LANs
nMuch
___________________cost
n___________________reliable
Token
nGood
for ___________________usage LANs
n___________________cost
n___________________reliable
Review
nName
the three types of access methods?
nWhich
is used in Ethernet?
nWhat
is the difference between CSMA/CA and CSMA/CD?
nIn
token ring, if a computer has data to transmit it must do what?
nWhich
is better, token or contention?
nPolling
adds a lot of ___________________traffic
to a network.
nMore
expensive, token or contention?
nMore
reliable, token or contention?
nDoes
the data travel with the token?
nTypes
of LANs that use token.
nTypes
of LANs that use contention
Kinds of topologies
n ______________—Describes the actual layout of the network
transmission media.
n ______________—Describes the path the signal follows
as it travels along a network.*

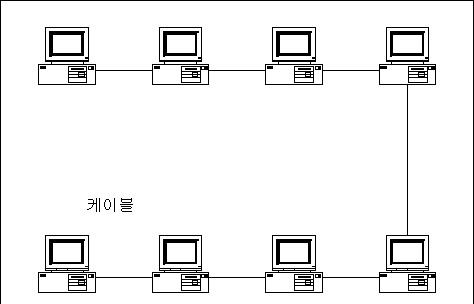
BUS Topology
n Uses ______________
n ______________ is the most common BUS topology
n Most bus networks broadcast signals in
______________ directions on a
______________cable.
n ______________ must be placed at each end of the
backbone cable to prevent signal bounce.
n ______________ must be done at one end.*

Ring Topology
n Network is wired in a ______________ or a
______________.
n Each device has a ______________ and a ______________
n Each device serves as a ______________
n Signal ______________ is very low
n Physical rings are very rare. Rings are usually ______________ in nature.*
Ring Topology
n Ideal for ______________ passing access methods.
n Often has ______________ ______________ schemes built
in.*
Token Ring
n Token rings use a
______________ ______________architecture
n Adhere to the
______________standard.
n ______________star, ______________ring
n Each node is attached to an ______________ (multi station access unit)
n The
______________adds fault tolerance so if one computer goes down, the
network still works.*
n Token ring cards run at either ______________ Mbps or ______________Mbps
n All
______________must run at the same speed
n Each node acts as a
______________. It reads a
______________and sends it on to its nearest neighbor.*
n If a node has a
______________, it captures
______________token when it comes to it.
n It then sends the
______________.
n The receiving node receives the message and replies
with a “______________” message.
n The sending computer receives the got it and then
releases the token back onto the
______________.*
Token Benefits
nEqual _______________________
to all computers
nAble to use _______________________priority
nVery _______________________networks—keeps
from _______________________down
nWhen carrying time _______________________data
that is imperative it be received
Auto-reconfiguration
nComputers on a token
network receive transmissions every _______________________seconds.
nIf a computer _______________________,
it is removed from the network. When it comes back, it won’t _______________________packets.
nIf 7 seconds pass and it
hasn’t received a packet it sends out a “_______________________” packet with
its address and the address of its nearest _______________________neighbor
nBy doing this, the _______________________can
determine where the problem is and _______________________automatically
reconfigure the network to include that computer.*
Review
n What is the logical and physical topologies of token
ring?
n NIC card speeds?
n All nodes are connected to a…
n What is a beacon?
n If a computer doesn’t answer a beacon, what happens?
n Describe how a computer sends data on a token ring
network.
n What is the purpose of the token?
n When a computer receives data meant for it, what
happens?
n How many computers on the network will see a data
frame?
Star Topology
n All devices connect to a ______________ ______________.
n The hub receives signals from other ______________devices.
n Can be used to implement a ______________or ______________logical topology

Star Wired Bus
n Hybrid topology that combines ______________and ______________
n Groups of workstations are connected to ______________ (star)
n Hubs are connected by single ______________ (bus)
n AKA Star Bus

Ethernet Standards (802.3)
n Speed—Originally
______________ Mbps, but 802.3u is
______________Mbps, and 802.3z is
______________Gbps
n ______________—Bus or star physical, always bus
logical
n ______________—coaxial, twisted pair, and now fiber
n ______________
Mesh Topology
n Each device is attached to each other ______________in the network.
n Considered a “______________” topology because it can
incorporate all other topologies.
n ______________!
n Difficult to use in a large LAN
n Completely
______________tolerant
n Can be all
______________or
______________ring and ethernet
Review
n What are the three major network topologies?
n What is the difference between a logical topology and
a physical topology?
n In a star topology, what is every device connected to?
n What must be done at the ends of an ethernet BUS?
n Which topology is also referred to as a “hybrid”
topology?
n Which is rare, a ring physical or a ring logical
topology?
n Where are physical ring topologies often used?
n A star topology can be a physical star, but a logical
__ or __ topology.
n Which topology is the most fault tolerant?
n Which topology is the most expensive?
n Which topology is the least expensive?
n Which topology often uses a token passing contention
method?
n Which contention method listens before it transmits a
signal?
Backbone Networks
n A network backbone is the cabling that connects ______________, ______________, ______________on a network
n Backbones usually have greater ______________than connected cabling
n Backbones carry more
______________
n In a large enterprise network, ______________is often
used as a backbone
Serial Backbone
n ______________backbone
n Two or more networking devices connected via a single
cable in a ______________chain
n Limited because it can quickly become ______________*
Distributed backbone
n A number of connectivity devices connected to a series
of central connectivity devices
– ______________
– ______________
– ______________
n Easy to
______________as the company/network grows.


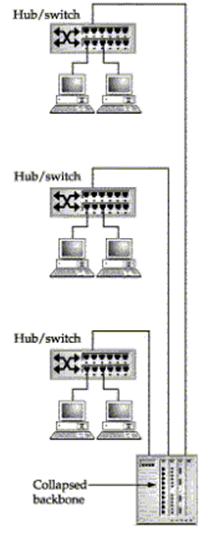
Collapsed Backbone
n Uses a
______________or ______________as
a single central connection point for multiple subnets
n Easier to manage and
______________
n Cheaper than
______________...but
n When multiple LANs are connected to one router, you
have a risky situation
n One
______________of
______________can bring down an entire network
Collapsed Backbones
Parallel Backbone
n Most
______________
n Combines
______________and ______________
n One or more connections from the central ______________to each network
n Redundant links ensure network connectivity
n More expensive due to increased ______________
n Better
______________tolerance
What is a Standard?
n Topologies simply describe layouts, but don’t get into
wiring, etc.
n Standards define
– ______________
– ______________
– ______________
– ______________
n Example: Ring is a topology, token ring network is an
architecture or standard
n Standards are
______________ in the 802 groups.
Review
n Which backbone is the cheapest?
n Which would be most expensive?
n Which would provide the best security?
n Which include a single ingress and egress to the rest
of the world?
n Which include fault tolerance?
ArcNet
n An
______________network not often found in business.
n Uses token
______________protocol.
n Can have a ______________or ______________physical topology.
n Uses
______________or
______________hubs, not an MSAU.
n Requires a
______________ohm terminator.*
FDDI
n Similar to token ring
n Uses
______________optic cable.
n Two classes of FDDI
– Class A—uses
______________rings that run in
______________directions.
– Class B—uses a
______________ring.*
Wireless LAN (802.11b)
n Speed—
n 802.11b __________Mbps
n 802.11g ______________and _____________
n 802.11n _________ to _________ mbps
n 802.11ac _______ mbs to ___________ Gbps
n Media—2.4Ghz and ______________________ radio waves
n Topology— ______________wireless, ______________bus
(because it is based on Ethernet and E’net always uses logical bus)
n Access Method— ______________/ _______*
FDDI
n Speed— ______________or higher
n Topology— ______________ring for fault tolerance
n Media—Fiber optic, although you can use ______________ (then called ______________) with the same technology
n Access Method— ______________passing
Net+ Module 03 Topologies and Architectures
Lab 3-1 Installing Visio and running tutorials
- Get out your Visio disk.
- Start your computer and log into an administrator account.
- Insert the Visio CD and run the installation.
- Complete the tutorials at: http://office.microsoft.com/en-us/visio/HA010837201033.aspx
Do Dis:
|
1. Open Visio 2. Notice that there are a lot of options for drawings you can create. We want to draw a network, so select Network |
|
|
3. Select Detailed Network Diagram using US Units 4. Visio will open a blank page. The difference in templates is the shapes that open with it. Look on the left. You’ll see bunches of shapes that can be used for your network. 5. Let’s create a simple star topology network. |
|
|
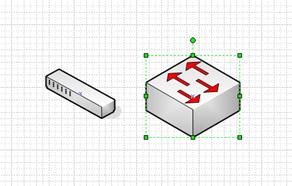
6. Click on Network and Peripherals and find the switch. It’s just a generic switch. 7. Click and drag it onto your drawing space. 8. If you’re creating a specific drawing using specific switches, you can download shapes from companies like Cisco. 9. If you’re doing a general drawing, such as a proposal, there are accepted symbols that you would use. 10. Click on Network Symbols 11. Find the workgroup switch. Drag it over to your drawing board. Notice that it has arrows that represent data sending and receiving. |
|
|
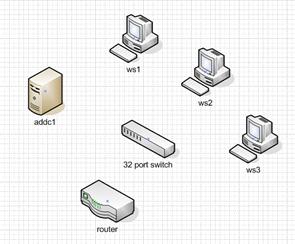
12. Go back to peripherals and drag over one server and one computer and one router. Go ahead and click on the switch symbol, hit the delete key and delete it. We’ll use symbols later. |
|
|
13. To make it easy you can copy shapes. Hold down the ctrl key on your keyboard and click and drag the computer you brought over. Create three of them. |
|
|
14. Now lets label each thing. Click the switch and just start typing 32 port switch. Label the others as shown. 15. Let’s create another Active Directory Server. Click, hold down control, and drag. Rename it ADDC2 by double clicking on the words and typing. |
|
|
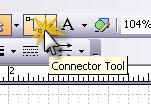
16. Now lets connect them together. Go up to the toolbar and select the Connector Tool. 17. Notice that as you bring your mouse over the switch it highlights where you can connect. 18. Click on the switch and drag the connector line to ws1. When ws1 gets a red box around it, let go. 19. Now pick up and move ws1. What happens? 20. Connect the rest of the devices.
|
|
|
21. Go into Annotations in the shapes. Drag over the one named 5 ruled column for annotation. 22. Click and type in your name, team name, and any other important information. 23. In EVERY network drawing you will annotate. This is a good place to indicate things like how many workstations one computer represents, speed of network, type of cable, etc. 24. Now go over to annotations and grab “Callout Bent”. Connect it to your router. 25. Type BootP Router. (That means the router will pass broadcast messages for DHCP and for network booting.) |
|
|
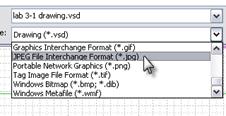
26. Save your drawing. It will save as a VSD file (a visio desktop file). That’s good for opening it and modifying it later, but if you want to put it into another program you need to export it. 27. Now let’s save it as a JPG. Note that once you do this, you won’t be able to change the JPG and any changes you make to the VSD won’t go to the JPG. 28. Go to fileàsave as… and select Jpeg. Ta da! |
|
|
29. Now create a new document and do the following 30. Go under FileàShapesàNetwork and note that there are a LOT more network shapes. Select a few and poke around. 31. Go to www.visiocafe.com and download the following shape packets: a. Dellfull.zip b. Microsoft Network Equipment Shapes 32. Now using the Network shapes and the Building Plan shapes, draw this room! |
Each person turn it in! |


Lab 3-2 The Star Topology
In this lab you’re going to set up a simple star physical network using three or four computers in your group.
Get the following:
8 Two or three computers running server or workstation
8 Enable file and print sharing on both computers
8 A small network hub or unmanaged switch
8 Cabling for each computer
|
1. |
Log off and turn off the computers. |
|
2. |
Obtain a hub. Connect each network computer to a hub. You are not going to connect this hub to one of our routers. We want just a simple peer to peer network. |
|
3. |
Turn the computers back on and log in locally. |
|
4. |
Change the computers from working within a domain into a workgroup. Each computer must have a unique computer name, but the workgroup names should all be netplus. |
|
5. |
In my network places, view entire network. Find the Netplus workgroup and double click. |
|
6. |
What do you see? |
|
7. |
Unplug one of the computers. What happens to the light on the NIC? |
|
8. |
What happens to the light on the hub? |
|
9. |
What do those lights indicate? |
|
10. |
View my network places, entire network. What do you see? |
|
11. |
Why? |
|
12. |
Reconnect your workstations to the classroom network. |
|
13. |
Rejoin the domain as before. |
|
14. |
Draw a picture of your network below and label the path of the data. |
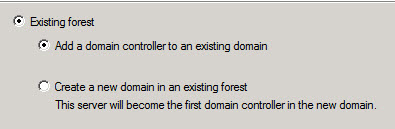
Lab 3-3 Installing Active
Directory
Before you start:
- If you don’t have your Server 2008 DVD, be sure to have the ISO available.

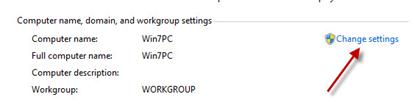
- Check your computer name on both of your ADDC servers. If they are some funky name, change them so it’s something easy to spell. NO LEET SPEAK.
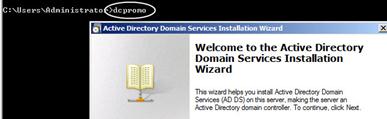
- You’re going to install Active Directory on your server. That will turn the server into a Domain Controller, or an Active Directory Domain Controller (which is why we named the virtual servers ADDC1 and ADDC2).
- Read on about Active Directory so you know what you’re doing.
Active directory is a directory that contains information about all of the objects in your network. Objects can be users, computers, shared folders, shared printers, organizational units*, etc. It also contains information about programs, what services are available and where to find them, security access, permissions, etc. In other words, it knows EVERYTHING about the stuff in your domain and controls access to those things.
AD is REALLY powerful. We’re going to do the main Active Directory stuff in this class, but we’ll only scratch the surface. You can do some super cool stuff with AD!
The basic building blocks of Active Directory are Domains, Domain Controllers, Trusts, Users, Groups, Forests, Organizational Units, Sites, Replication, and the Global Catalog.
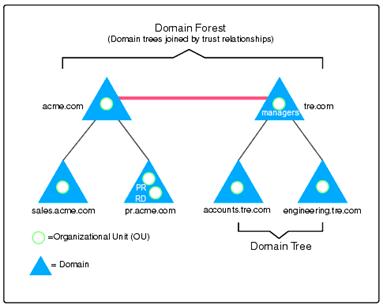
Here we have two forests. A forest is a collection of domains. A domain is a collection of users, organizational units, computers, servers, shares, etc.
We’ll learn more as we go along.
Directions
|
1. What is the minimum number of Domain Controllers you should have in one network? 2. Why? 3. AD DS will require _____________ to be installed. 4. What do you do if you don’t have that? 5. After you install the role, what do you have to do to make the server a fully functional domain controller? 6. What are three other things AD will install? |
|
|
|
|
|
|
|
|
|
|


Questions
1.
What is Active Directory?
2. What things are
the building blocks of Active Directory?
3. What server did
you install AD on?
4. What is DCPromo?
5. Why put the forest
functional level at server 2003?
6.
If you have one server that is 2003, and three that
are 2008 and all are ADDCs (Active Directory Domain Controllers), what Domain
Functional Level do you set it at?
7. What is a forest?
8.
What is a domain?
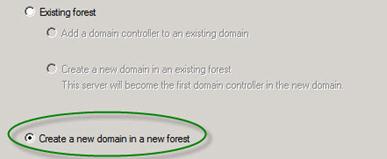
9. What is your root
domain?
10. What did you name
it?
11. What three roles
are you installing on your server?
12. What is a global
catalog?
13.
What domain holds the global catalog?
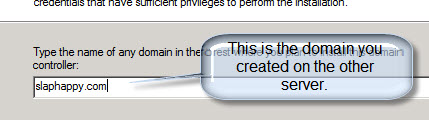
Lab 3-4 Installing a Second
Domain Controller
Before you start:
- Check your computer name on both of your ADDC servers. If they are some funky name, change them so it’s something easy to spell. NO LEET SPEAK.
Directions
|
|
|
|
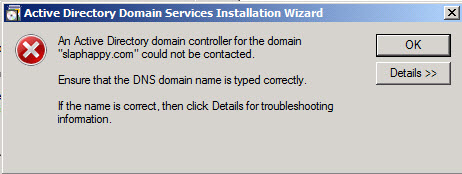
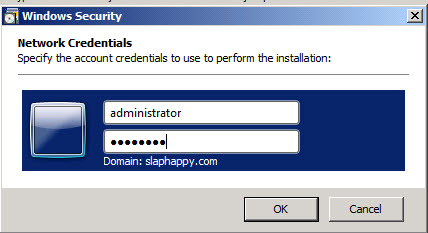
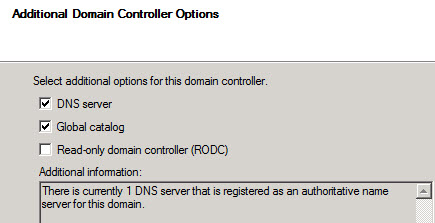
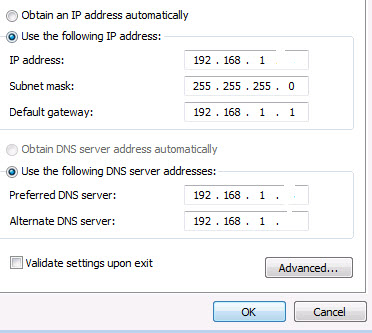
Potential issues: a. You spelled the domain wrong. Click OK and go back. b. Your server isn’t seeing the other DNS server. If that’s the case go into the properties of your network card on this server and make the first DNS Server address the address of the OTHER server. c. You put in the wrong username or password. d. Your server is off (the other controller). e. Your computers can’t see each other. Ping them by IP address and make sure they can see each other. f. Unknown. Try restarting the other server. |
|
|
|
|
|

Questions
14.
What is DNS?
15. Is DNS required
for Active Directory?
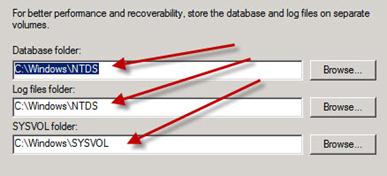
16. Where did you
store the SYSVOL folder?
17. What password did
you use?
18. Did you get the
error message about the domain not being able to be found? What did you do to
resolve it?
Don’t feel bad, I got that error too and had
to change the DNS IP address.
While your AD is installing on this server, go
into your other server and do the following:
1. Open D
|
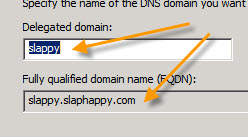
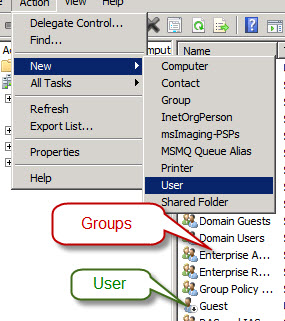
1. Open your DNS Server (Administrative ToolsàDNS) 2. What you see is your server. Expand that and you’ll see Global Logs, Foreword Lookup Zones, Reverse Lookup Zones, and Conditional Zones. 3. Expand Forward Lookup Zones. 4. You’ll see the name of your domain. 5. Right click and select New Delegation. 6. Click Next when the wizard comes up. 7. It’s going to ask for the name of your DNS Domain. You want the DNS domain of your CURRENT server. So I’m on my server named SLAPPY so I’m going to type SLAPPY
|
|
|
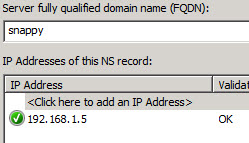
8. On the next page you want to create a new Name Server Record. DNS has a lot of “records” in it. So if you have a computer named fred at IP address 10.10.2.5 there is a record for that. A name server record is the IP address and name of a server running DNS. 9. If you don’t know the IP address of your OTHER server, type in the name and click RESOLVE. If you typed the name in correctly, it’ll show up with a green circle with a checkmark in it. 10. Click OK 11. Click Next. 12. Click Finish. |
|
|
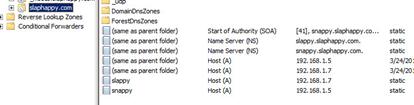
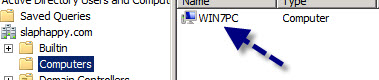
13. Check to make sure it worked! 14. Go into your second domain controller. 15. Open Forward Lookup Zones 16. Open Slaphappy.com (or your domain) 17. You should see records similar to the ones on the right. a. Start of Authority (should be the name of your server) b. Name Server (NS) the other server FQDN c. Name Server (NS) this server FQDN d. Host (A) records including ones for each of your computers in your network. |
|

Lab 3-5 Joining Your
Workstation to the Domain
Before you start:
- Make sure your servers are turned on. If you don’t have enough RAM, at least have one of them on, preferably ADDC1.
Directions
|
|
|
|
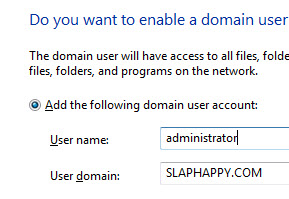
61. When it’s done it will ask you if you want to create a domain user account on this computer. YES you do. 62. Why? Because if you set a domain account on your computer as a local administrator, when the computer won’t talk to the domain you can log in with that domain account locally and fix it. 63. Leave it the same (since you’re only adding an already created account, not making a new one). Click next. 64. Make it an administrative account. 65. When you’re done it will tell you that you have to restart your computer. Do that. 66. Note: You can do the same thing with a server, but not a domain controller. You might have, for example, a web server or file server that you don’t use for authenticating and controlling users. |
|
|
|
|
|
|
75. Go to ADDC1
|
|

Questions
1. What is the address of your preferred DNS server?
2. What is the address of your secondary DNS server?
3. What is your subnet mask?
4. What is your Default Gateway?
5. What is a default gateway?
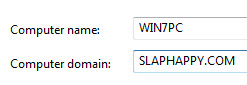
6. What is your domain name?
7. How do you join a workstation to a domain?
8. Can you do that to a server too?
9. What kind of server do you NOT join a domain this way?
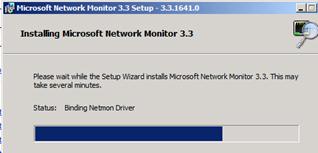
Lab 3-6 Using Network Monitor
On this lab you’re going to use a Windows 2008 Server computer (or Windows 2003) to take a peek at some data packets. Windows comes with some built in and extra programs that you can use to monitor different types of network performance.
Get the following:
8 A computer running Windows 2008 Server with Active Directory installed
8 A workstation connected to server’s domain
8 A crossover cable or hub and cables to connect the two computers together
8 Windows Server 2008 disk
|
|
|
|
|
|
|
|
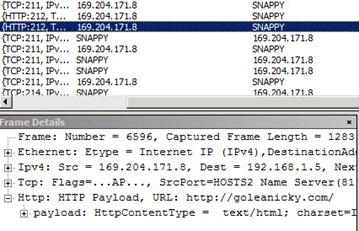
33. Go to your IE and type in a URL that doesn’t exist (I used www.goleanicky.com). Make sure you get an error (probably Could Not Connect to Server). 34. Now go back and look at the Frame Summary. Scroll over so you can see, under description, the HTTP Payload that corresponds to the bad URL. (Payload is what is delivered in request to www.goleanicky.com.) 35. Right above it should be a RESPONSE. Click that frame. Click on HTTP: Response in the Frame Details window. 36. It’ll say “StatusCode”” somewhere. Why couldn’t it find this URL? |
|


1. Why use NetMon on your server?
2. Look at your traffic and answer the following questions:
a. Locate an ARP Request. What IP address is making the request?
b. What is it asking for?
c. What is the response (it should show the MAC address)?
d. ARP is Address Resolution Protocol where you can give the computer an IP address and it will resolve it to the MAC address of the device.
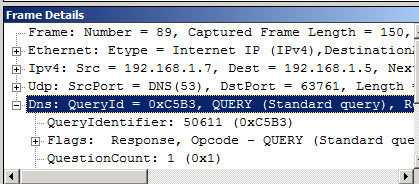
e. Go under FilteràDisplay FilteràLoad FilteràDNSàProtocol Filter DNS. Apply that filter. What do you see?
f. Play around with a few other things. Don’t worry if you don’t completely understand it right now.
Network Drawing Activity
A small company has hired you to assist them in selecting a network topology and communication media to use in the building of a new network. The company is small, but growing. Currently in the company campus, there are four different work areas with 25 computers in each area. They need to be networked, and in addition they need to have the ability to link to a larger network within the city limits.
Job One—On your first meeting with the Acme team they tell you they would like to have some examples of basic network designs. On this piece of paper, or using your paint program, draw and label examples of three basic network topologies for Acme.
Job Two—Explain the advantages and disadvantages of each of the topologies you summarized for the Acme Team. Based on your knowledge to this point, what topology would you recommend?
Job Three—Acme has discussed your options and done some reading on their own. They have some questions about coaxial cable versus twisted pair cable. Draw up a comparison chart for them using MS Word and then make a recommendation on which should be used according to your current knowledge.
Job Four—Acme has decided to go with a
coaxial based Ethernet system. Go online and price out for
1000 feet of thicknet coaxial cable
100 connectors
Terminators
Describe the cost for each and the types of connectors/terminators required. Since you want to do the best job you can, go for the gold plated high-quality components.
Job Five—Since Gary wants Thicknet, he’s going to have to abide by what rule? Describe this rule to him and explain why it will mean extra cabling.
Job Six—I am going to give each team a scenario. I want each team to create from that scenario the following:
1. A proposal to the company that addresses the following:
a. Different types of topologies, including
i. BUS
ii. Token-Ring
iii. Star
iv. Cascading star
v. Mesh
b. Different types of architectures
i. Ethernet
ii. Token-Ring
iii. ARCNet (just a brief overview because no one creates a new ARCNnet network any more)
iv. FDDI
c. Access methods of each
d. Which topology is best for their needs
e. Drawing of the proposed network including:
i. Servers
ii. Cabling (label type)
iii. Connectors
iv. Workstations
v. Access method
f. Include
i. Graphics
ii. Cable types
iii. Connector types
iv. Special cables if needed
v. Access speeds
vi. Label how the information moves around the network.
vii. 5-4-3 rule if it applies
viii. Network type (peer to peer vs client/server)
Create a proposal for each scenario and be prepared to present the proposal to the class. Use either PowerPoint or a report and use VISIO for the drawings. Address all issues for full credit. See rubric below for exactly what you will be graded on.
Rubric
|
Requirement |
Excellent
(10) |
Good
(8) |
Poor
(5) |
Not
Observed (0) |
|
Explanation of the option of different kinds of topologies, including bus, star, cascading star, token ring, and mesh. |
|
|
|
|
|
Explanation of the options of different types of architectures, including Ethernet, token-ring, ARCNet, and FDDI) |
|
|
|
|
|
Access methods used by each topology. |
|
|
|
|
|
Suggestion of which topology would best fit their needs. |
|
|
|
|
|
Drawing
of the network, which includes: |
||||
|
All computers on network (servers and workstations) |
|
|
|
|
|
Label cable types |
|
|
|
|
|
Label connector types |
|
|
|
|
|
Label access speeds |
|
|
|
|
|
Label access method |
|
|
|
|
|
Describe topology and architecture |
|
|
|
|
|
Worth 100 points. Points awarded: |
|
|||