|
Company
Name |
|
|||
|
Employee
Names |
|
|||
|
Team
Lead |
|
|||
|
Module
Name |
Protocols and Services |
|||
|
Certification
Test |
|
Vendor |
|
|
|
Objectives
covered |
|
|||
|
Time
allotted |
10 days |
Time
Taken |
|
|
|
Date
Started |
|
Date
Completed |
|
|
Portfolio Contents—All components are REQUIRED for a unit grade higher than incomplete.
|
Item |
Complete |
Incomplete |
Points Awarded |
|
Written
test Scores for each member (attach printout) |
Score |
|
|
|
Quizzes
emailed to Mrs. K (taken on website) |
|
|
|
|
|
|
|
|
|
|
|
|
|
|
Completed solution to problem
portfolio (see rubric for score) |
|||
|
Task
One: Jargon |
|
|
|
|
Task
Two: Questions |
|
|
|
|
Task
Three: Customer needs |
|
|
|
|
Game |
|
|
|
|
Flyer |
|
|
|
|
Poster
or sign |
|
|
|
|
Quiz |
|
|
|
|
Budget for Unit |
500 |
|
|
|
Expenditures |
|
Remaining Budget |
|
|
Tardies
(5/day) |
|
Labs |
N/A |
|
Absences
(10/day) |
|
Hardware
Test Score Average |
N/A |
|
Off Task
(50/student/day) |
|
Objective
Test Score Average (100) |
|
|
Consultation
Fees (50/consultation) |
|
Project
(400) |
|
|
Seminar
(100) |
|
Total
(500) |
|
|
Missed
deadline (100/day) |
|
|
|
|
Total |
|
|
|
|
Budget
remaining |
|
|
|
Network Services
Unit 05 Network+
TCP/IP Rules
•
TCP/IP is the
_______________ suite that allows computers to access the Internet.
•
Windows 2000
requires TCP/IP to run all of its services and features.
•
_______________
is a huge protocol stack that just keeps getting bigger and bigger with the
development of new technologies.*
The IP Address
•
The _______________ address is one of the
addresses on a computer. This is the one TCP/IP uses to access the Internet.
•
It is made up of
four _______________ translated from
binary into decimal. (example: 11111111.11111111.11111111.000000000=
_______________ which is a _______________ mask).
•
You can assign IP
addresses either _______________ or
dynamically.*
Assigning IP Addresses
•
Static IP
addresses require you to _______________
assign them to every computer on the network.
•
_______________
IP addresses are assigned via a DHCP (dynamic host configuration protocol)
server.
•
The DHCP server
assigns an IP address to every
_______________ as they log onto the network. It also assigns the subnet
mask, default gateway, WINS and DNS servers.*
DHCP Lease Process
•
The _______________ logs onto the network.
•
It sends out
a _______________ message to IP address
255.255.255.255. This broadcast goes to all computers on the network.
•
The DHCP server
sends back a _______________ reply with
the offer of an IP address for a specified lease time. This is sent using the
MAC address of the client.*
•
The client sends
a _______________ message to all DHCP
servers to let them know it has an IP address.
•
The DHCP server
sends a _______________ packet that has
the IP address, gateway, WINS, and DNS server addresses.
•
If for some
reason the lease is not successful the client sends a _______________ (negative acknowledgment)
message and starts the process over again.*
Lease renewal
•
Once a client has
an IP address it will attempt to renew it before the _______________ expires.
•
It sends renewal
requests (repeating if not successful) at:
l _______________ through the lease
l Sends DHCPREQUEST messages at _______________, _______________, and _______________ second intervals
l If no server responds at _______________ % through the lease it will
issue a new lease request.*
Important DHCP tidbits
•
When a
client _______________ down, it does not
send a DHCPRELEASE message. It tries to keep the same IP. (You can release and
renew manually.)
•
If a client has
an IP address leased, it does not send out a DHCPDISCOVER message, instead it
sends a DHCPREQUEST message. If the client has moved subnets, it will receive
that message and then start over with a _______________
request.*
Setting up a DHCP Server
•
Your server must
have
l A
_______________ IP address, a subnet mask, a default gateway (if
needed), and other necessary TCP/IP options
l The
_______________ service installed
l A range (or
_______________) of IP addresses that can be leased to clients
l _______________ with Active Directory services
•
It can be a
standalone server or a member server.*
What is a DHCP Scope?
•
A scope is a
range of _______________ available for
leasing.
•
A server can have
more than one scope.
•
The scopes cannot
overlap
l Example:
l 10.4.4.1-10.4.4.134 and
l 10.4.4.140-10.4.4.240
l In this example, 10.4.4.135-10.4.4.139 are probably
assigned statically to computers.
l The addresses can be from different _______________, as the server does not need
to be on the same subnet as its addresses.*
DHCP Scope and Options
•
Any _______________ IP addresses must be excluded
from the scope.
•
You can set
up _______________ in DHCP Manager.
•
DHCP options are
used to _______________ options in
addition to the IP address, such as:
l _______________ servers
l Default
_______________
l _______________ servers, etc. *
DHCP Relay Agents
•
DHCP requests are
sent using b-node _______________.
•
_______________
do not cross subnets.
•
Because of this,
_______________ agents are required to pass these requests to DHCP servers on
different subnets.
l One method is to use a special router that is set up
to send only DHCP and BOOTP requests.
l The other is to set up a relay agent on each subnet
that does not have a DHCP server.*
Windows Internet Naming Service
•
If you have only
Windows 2000 computers in a network, you can use _______________ for all name resolution.
•
However, if you
have _______________ operating systems
(pre-2k) you will need a WINS server to provide resolution of IP addresses to
NetBIOS names.
•
What are NetBIOS
names???*
LMHOSTS
•
Before _______________ servers each computer had
a _______________ file that was just a
text file with a list of IP addresses and Netbios (host) names.
•
This worked
great, until the network grew.
•
Pretty quickly
the LMHOSTS file became outdated because every addition of a new computer
required a new entry into
_______________.*
Enter the WINS Server
•
The _______________ server provides the same
service the LMHOSTS file used to, except on a network level.
•
It _______________ updates every time a computer
logs onto the network.*
WINS Name Resolution Process
•
Registration
l Client logs on and sends its _______________ and _______________ to the WINS server.
l If the name is already in the database with a different
address, the server tells the client that name is already on the network, and
won’t _______________ it.
l At the same time it sends a message to the original
client with a _______________ to prove
its still on the network.
l If the client doesn’t respond after _______________ attempts, the new client is
registered under that name.*
•
WINS Name Renewal
l WINS names must be
_______________ or the database purges them.
l The client attempts to renew its name when 50% of
the _______________ (time to live) has
passed.
l If the server doesn’t respond, it tries again
every _______________ minutes.
l When the renewal is successful, the server sends a new
TTL to the client.*
WINS Name Resolution, cont.
•
WINS name release
l When you
_______________ down your client successfully, before it shuts down it
sends a release request to the WINS server.
l This allows another client to use that name, if
necessary without going through the challenge process.
l If not
_______________ down correctly, the name remains until the TTL is up.
l If a computer sends a release but with the wrong _______________, the server ignores that
request.*
WINS Name Resolution/Query
•
When a computer
wants to find another computer on the network
l Checks its local
_______________ name cache to see if the entry is there.
l Submits a request to the _______________ server.
l The server sends either a positive or negative
response, depending on if the computer is found.
l If the client receives a negative response from the
server, it sends out a broadcast to try to locate it. A WINS server helps cut down on
traffic by reducing these _______________ on the network.*
WINS Servers
•
Has to be set up
on a _______________.
•
Microsoft
suggests no more than _______________
WINS servers.
•
Two WINS server,
a primary and backup, can handle
_______________ computers…so you probably won’t need 20.
•
Not required if
all computers are Windows 2000 or above.*
New Features of WINS in 2003
•
Persistent
connections with _______________
partners…speeds up network.
•
Manual _______________ —An admin can mark a record
for deletion and it automatically is deleted on all WINS servers on the
network.
•
_______________
handling—Can handle lots of requests at once, such as when a lot of computers
are restarted after a power outage.*
Static Mapping
•
Sometimes a
computer/device is not a _______________
client.
•
In this case the
admin can go in and _______________
enter a record for that client. This is called static mapping.
•
This gets _______________ to the other WINS servers
right away and never expires.*
What clients can use WINS?
•
Windows _______________
•
NT
•
Windows 9x
•
Windows for _______________ 3.11
•
MS DOS with _______________ _______________ 2.2c
•
MS DOS with MS
Network Client vers 3.0 and real-mode TCP/IP driver.
•
Each client must
have the IP address of one WINS server to use WINS.*
WINS Proxies
•
Similar to a DHCP
relay agent…listens for requests from non-WINS clients and passes those
requests to the _______________ server.
•
Can resolve both
name _______________ and name _______________ requests by sending them to
the WINS server.*
DNS
•
A _______________ server uses the DNS protocol
to resolve IP addresses to fully qualified domain names (_______________) and
vice versa.
•
It is required
for _______________ access to have at
least one address of a DNS server.
•
It is best to
have more than one _______________ in
case one goes down (fault tolerance).*
DNS Namespace
•
The DNS namespace
is _______________.
•
The first
division is _______________
_______________ _______________
l .com, .edu, .gov, .tv, .net, .org, etc.
•
The second
division is _______________ called second level domains
l Teechur.com, nasa.gov, cbs.tv, future-techs.org
•
Each second level
domain can be divided into further
_______________.*
DNS Namespace, cont.
•
Second level
subdomains
l www.teechur.com,
ftp.teechur.com, files.teechur.com, etc.
l Each of these identifies a different computer in the
teechur.com domain. One for Internet, one for ftp, one for data files.
•
To traverse
this _______________, you start at .com
and move down….com, teechur.com, www.teechur.com.*
Domain Host Name Specifications
•
Keep the number
of subdomains small…no more than 3 or 4.
l _______________. If we continue, we have
ac10.mphs.msvl.wednet.edu and possibly ac10web.ac10.mphs.msvl.wednet.edu.
l After awhile it gets ridiculous.
•
Every computer must
have a unique name.*
Domain Host Name Specifications, cont.
•
Keep names _______________.
l Names can be up to 63 characters.
l But who is going to remember toryklementsensdomain.com?
•
Use standard _______________ in domain names.
l A-Z, 0-9, and -. You can also use special unicode
characters required for foreign languages, but who is going to remember that/
•
A fully qualified
domain name is the combination of the
_______________ name and
_______________ location. So, www.teechur.com
says that the www computer is located in teechur.com.*
Zones of Authority (sounds ominous, doesn’t
it?)
•
Each namespace is
divided into _______________.
•
Each zone must
have a _______________ server
responsible for mapping the zone. This would be the DNS server.
•
Depending on the
size of the company, there may be one server for all the zones, or one server
in each.
l A small company will probably only have _______________ server.
l A
_______________ might have to have more than one.*
Resource Records
•
Each DNS server
has a number of _______________ records
that you can assign manually that are in addition to the resolution records.
•
Two records are
automatically added when you install your DNS server
l Start of Authority (SOA) record—IDs the DNS server
that is the _______________ for that
zone.
l Name Server (NS) records—Lists addresses of _______________ for specific domains. These
are used to find addresses that aren’t in the local database.
l The longer the server runs, the less often is has to
use the NS records because it remembers the mappings.*
DNS Name Resolution
•
So how does your
computer find that website??
•
Computers looking
for clients/sites using domain names use forward lookup queries.
l Client sends a
_______________ for www.teechur.com
l The
_______________ DNS server looks in its database for the address. If it
finds it, it sends the address to the requestor and life is good.
l If it doesn’t find it, it forwards the query to
the _______________ DNS server.
l The root DNS server sends the address of a DNS server
for the .com domain.
l Continued…*
Forward Lookup Queries, cont.
•
The local DNS
server _______________ its request to
that DNS server.
•
The server finds
that address, sends it back to the local server.
•
The _______________ server forwards the address
to the client and
•
The local
server _______________ the query results
so that next time someone on its domain looks for www.teechur.com, it knows the address. It is
assigned a TTL and purged if it isn’t used when the _______________ expires.*
Reverse Lookup Queries
•
The reverse
lookup resolves IP addresses to domain names using the special domain _______________.
•
This is a
hierarchical domain based on IP addresses, not names.
•
You can configure
your _______________ server to use
reverse lookup if necessary.*
DNS Server Roles
•
Primary DNS
server
l Contains a
_______________ copy of the lookup database for the zone.
l This is the only copy that can be modified.
l Contains the
_______________ for the Internet root DNS servers.
l Can act as a
_______________ server for another zone.
•
Secondary DNS
server
l Provide fault
_______________ and load balancing for other servers.
l Contains a
_______________ only copy of the lookup database.*
Other DNS Server Roles
•
Caching only
servers
l Do not contain a copy of the _______________ map.
l Cache external queries in the database, making those
lookups available for clients.
l DNS Forwarder gets requests from a forwarding server
and sends the lookups back. Does not handle
_______________ directly from clients.
•
Dynamic DNS
Server (new in W2K)
l Works like
_______________ with a DHCP server
l Automatically updates when new clients come online.*
Integration of DNS with Active Directory
•
DNS is required
for Active _______________ to work.
•
Primary _______________ data can be stored in Active
Directory.
•
This allows
automatic _______________ of the data
throughout the AD structure for:
l Fault
_______________
l _______________ (can limit who can update)
l Ease of
_______________
l Efficient
_______________ of large zones.*
DNS Clients
•
Can
configure _______________
•
Can
configure _______________ using DHCP
•
If DNS is configured
statically, this will override the DHCP DNS server addresses, so ensure that no
one is messing around with the TCP/IP properties.*
Dfs
•
Distributed file
service allows _______________ to manage
a group of folders/volumes and present them to users as one folder or set of
folders…and they are none the wiser.
•
Saves people from
having to go to many different
_______________ to access resources.*
Benefits of Dfs
•
Resource
administration—if a server with files on it goes down you can point the Dfs
link at another _______________ (back up
or replicated) and users can still use it.
•
Drive
mappings—You don’t need drive
_______________ with Dfs because the user can access many resources
through one Dfs tree.
More benefits of Dfs
•
Fault tolerance
and _______________ balancing—can have
multiple providers for one resource which Dfs can access to balance the load on
one server. If a resource goes down, the user can access another one without
even knowing.
•
Network
permissions—uses regular old
_______________ permissions, no extra security
•
Integration with
IIS—IIS can use file resources through a Dfs tree and use its load balancing,
fault tolerance, and high reliability of Dfs.*
Sharing Folders Using Dfs
•
Two types of Dfs
roots
l _______________ -alone
l Fault- _______________
Stand-alone Dfs Root
•
Info stored in
the registry of the server hosting the Dfs root.
•
Limited for
a _______________ level of Dfs nodes
•
Not fault _______________ as they are a single point of
failure in the network.
•
No _______________ or backup services
Fault-tolerant Dfs Root
•
Exist in _______________ Directory and rely on
multiple servers to fill requests.
•
Changes are _______________ synchronized and published
with AD services, providing fault tolerance
•
Must reside on
an _______________ 5.0 disk partition
and hosted on a W2K domain controller.*
Dfs Child Nodes
•
Links that
connect to the user browsing the Dfs tree to the shared resource somewhere else
on the network.
•
Each node appears
as a _______________
•
Opening the
node _______________ the user to the
other server
•
Location of the
actual _______________ can’t be
determined by the user (without a third party program).*
Managing Printers
•
Printers can be
your biggest headache in a
_______________.
•
Managing them
will take a great deal of your time.*
OSI
Model Protocol Table
Using the protocols in your lecture, fill out the table below to use to remember which protocols work at which layer.
Why do we care? Because when there are networking communication problems, knowing which layer a protocol works at can tell us which piece of hardware or which program might be malfunctioning.
|
Application
Layer |
|
Presentation |
|
Session |
|
Transport |
|
Network |
|
Data
Link LLC |
|
MAC |
|
Physical |
Mod 05-Protocols and Services
Lab
Check off Sheet and Report
|
Certification Tests and Objectives Covered in Labs |
||||||||||||||||
|
A+ Operating System |
A+ Hardware |
Network+ |
Windows XP Professional |
Windows 2003 Server 70-290 |
CISCO 640-801 |
|||||||||||
|
|
1.0 OS Fundamentals |
|
1.0 Installation, Configuration, and Upgrading |
|
1.0 Media and Topologies |
X |
Installation |
|
Managing and Maintaining Physical and Logical Devices |
|
Planning and Designing |
|||||
|
X |
2.0 Installation, Configuration and Upgrading |
|
2.0 Diagnosing and Troubleshooting |
X |
2.0 Protocols and Standards |
|
Implementing and Conducting Administration of
Resources |
|
Managing Users, Computers, and Groups |
|
Implementation and Operations |
|||||
|
|
3.0 Diagnosing and Troubleshooting |
|
3.0 Preventative Maintenance |
X |
3.0 Network Implementation |
|
Implementing, Managing, and Troubleshooting Hardware
Devices and Drivers |
|
Managing and Maintaining Accesses to Resources |
|
Troubleshooting |
|||||
|
|
4.0 Networks |
|
4.0 Motherboards, Processors, and Memory |
|
4.0 Network Support |
|
Monitoring and Optimizing System Performance and
Reliability |
|
Managing and Maintaining a Server Environment |
|
Technology |
|||||
|
|
|
|
5.0 Printers |
|
|
|
Configuring and Troubleshooting the Desktop
Environment |
|
Managing and Implementing Disaster Recovery |
|
|
|||||
|
|
|
|
6.0 Basic Networking |
|
|
|
Implementing, Managing, and Troubleshooting Network
Protocols and Services |
|
|
|
|
|||||
|
|
|
|
|
|
|
|
Implementing, Monitoring, and Troubleshooting Security |
|
|
|
|
|||||
Check
off each of the labs as you complete them below. Turn this in with your lab
reports.
|
Requirement |
Completed |
Filled Out Lab Sheet |
Not Attempted (0 on labs for unit) |
|
Lab 5-1 Installing DHCP |
|
|
|
|
Lab 5-2 Installing WINS |
|
|
|
|
Lab 5-3 Observing Windows Processes |
|
|
|
|
Lab 5-4 Managing Users |
|
|
|
|
Lab 5-5 Dfs Root |
|
|
|
|
Lab 5-6 Policies |
|
|
|
|
Lab 5-7 EFS |
|
|
|
|
Lab 5-8 User Printer Rights |
|
|
|
|
Lab 5-9 Profiles |
|
|
|
Lab 5-1 Installing a DHCP Server
Complete this after you have installed your Active Directory and DNS Servers.
Windows 2003 uses/installs as default TCP/IP protocol. While in a small home network it is easy
to assign manually the IP-addresses (or use
the Windows98/ME Auto-IP-configuration and / or
the Windows2000 Auto-IP-configuration), you will
on an office network like to use the "comfort" of using a DHCP-server to control and manage the distribution of
IP-addresses.
Note: on the system, where the DHCP-server is getting
installed, you MUST
use a static (= manually assigned) IP-address.
|
Run the
Manage Your Server wizard to set up a DHCP server. m StartàProgramsàAdministrative toolsàManage Your Server m Select add
or remove a role. The configure
your server wizard will pop up.
Click next |
|
You will see a list of server roles. If your server has already been
configured, it will say “yes”. If not, it says no. Select DHCP server and click next. |
|
A summary of your selections will come up. Click next. |
|
Wish upon a star, contemplate
the meaning of life, pick your belly button…wait while the server installs.
It won’t take long. |
|
Wait some more. This is taking
longer than expected. |
|
Whistle while you work. |
|
After forever and a day you
will see something that tells you DHCP has been installed. Well it’s about
doggone time! Sheesh! Like we have all day for this kind of stuff. Oh wait,
we do. The reason it takes so long is that it is checking to make sure there
are services available to fulfill this role (new services have “dependencies”
which means they often “depend” on another service to do their job. Just like
if you’re working with a partner to make a sandwich. You might “depend” on
him to lay out the bread. If he’s not there, you can’t make the sandwich
because…no bread. |
|
Next you need to configure your server
for it to work. Look under the Administrative tools and you will find a new
applet named DHCP.
|
|
|
|
||||||||||||||||||||||||||||||||||||
|
Configuring
your DHCP Server |
||||||||||||||||||||||||||||||||||||||
|
1.
Select DHCP from the Administrative Tools
menu. 2.
You will see that your DHCP server needs to still
be authorized. That’s okay. We’ll deal with that later. 3.
The first thing you’ll do is define a range of IP
addresses called a scope. Your users will be assigned one of these IP
addresses when they log on. 4.
Right click on your server and select New Scope
in the drop down menu. |
||||||||||||||||||||||||||||||||||||||
|
|
||||||||||||||||||||||||||||||||||||||
|
1.
Up comes a wizard (of course). Click next when the
first window appears. 2.
Define a name for your scope. Name it domainxx-scope.
(If my domain is domain04 I would name my scope domain05-scope.) 3.
Give it a happy description. |
||||||||||||||||||||||||||||||||||||||
|
|
||||||||||||||||||||||||||||||||||||||
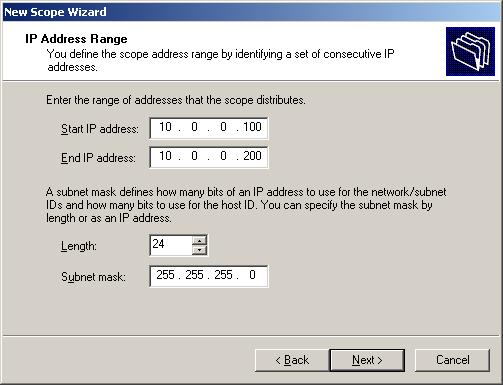
|
4.
Click next. Define a range of IP addresses. You
have to make sure your own static IP address is NOT in that range or all
sorts of problems will occur. 5.
Use the following syntax for ranges:
192.168.yy.05-192.168.yy.20 where yy=domain number. See examples below:
6.
Use the subnet mask 255.255.255.0 7.
Use the DNS of your server IP. 8.
Use the default gateway of your server IP. |
||||||||||||||||||||||||||||||||||||||
|
|
||||||||||||||||||||||||||||||||||||||
|
9.
Click next. You will not define any exclusions.
Exclusions would be used if one or more IP addresses within your range must
not be assigned. For example, maybe you have a static IP of 192.168.02.13
assigned to your laser printer. You would want that address excluded from
your range so that there are not IP address conflicts. So just leave
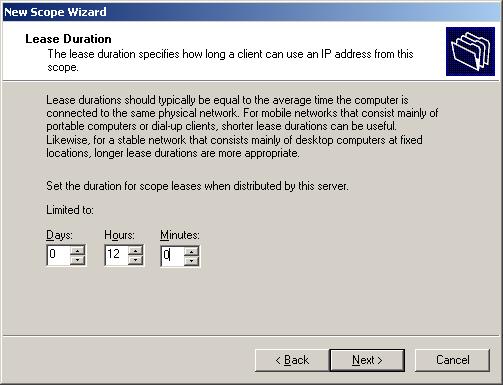
everything as-is and click next on the exclusion screen. 10.
You are “leasing” your IP addresses for a specific
period of time. This is so IP addresses aren’t assigned and never released.
Usually 8 days is appropriate. Everyone gets their same IP address for a
week, and it is renewed before the lease is up. (Your computer will request a
renewal when half the lease time has expired, so even though it’s a DHCP
assigned IP address, you usually have the same one all the time.) But if
someone comes in and logs in for a day then never returns, the IP address
leased to them will remain out of commission for the entire lease. That means
if you have a really long lease time you will be using addresses that aren’t
really being used. 11.
Let’s set our lease time to 2 days. |
||||||||||||||||||||||||||||||||||||||
|
|
||||||||||||||||||||||||||||||||||||||
|
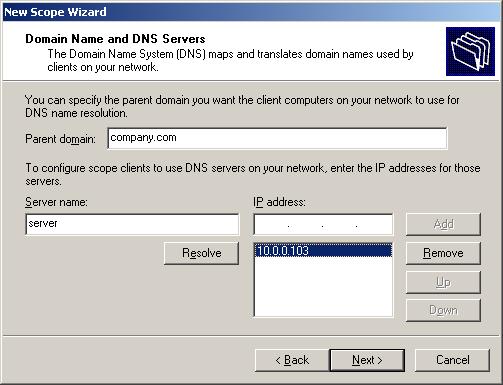
12.
Click next. On the next screen you are asked if you
want to configure other DHCP options. Say yes and click next. You need to
tell the DHCP server to also assign a default gateway and DNS server(s)
addresses. 13.
Your default gateway is the same IP address as your
server. So type in the IP address of your server. Click Add. Click
next. |
||||||||||||||||||||||||||||||||||||||
|
|
||||||||||||||||||||||||||||||||||||||
|
14.
If you had more than one DNS server or other
special servers on a WAN you would want to tell the DHCP server where those
other servers are located. Since you don’t have this, leave the next screen
as is and click next. |
||||||||||||||||||||||||||||||||||||||
|
15.
Go ahead and configure your server IP in the WINS
server window. We’re going to install WINS next. |
||||||||||||||||||||||||||||||||||||||
|
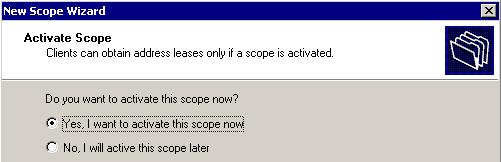
16.
If you’re ready for clients to start using your
DHCP server you want to activate your scope. If not, you don’t. We are so
click Activate Scope on the next screen, then click next. |
||||||||||||||||||||||||||||||||||||||
|
|
||||||||||||||||||||||||||||||||||||||
|
17.
Is there a typo on that screen? How odd! 18.
Anyhow, you’re done setting up your DHCP server so
on the next screen click finish! However, you are not really done. You still
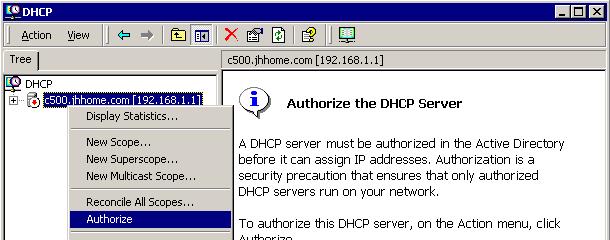
have one more thing to do. You have to authorize your DNS server. 19.
In the DHCP applet right click on your
server and select Authorize to authorize this server to act as a DHCP
server in your domain! Whew! You’re done! |
||||||||||||||||||||||||||||||||||||||
|
|
||||||||||||||||||||||||||||||||||||||
|
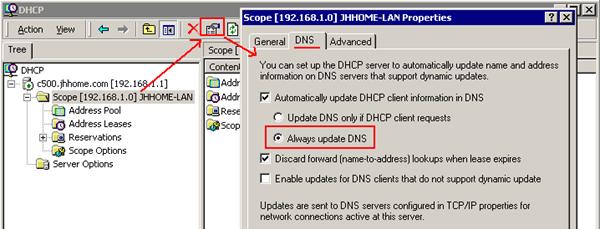
A
few more housekeeping items: 1.
Close DHCP and re-open it. You should be able to
click on your DHCP server and it should say “running.” 2.
Click your scope. Click the button as indicated
below. You want to tell your server to always let DNS know when someone gets
a new IP address. 3.
Click the options as shown below. This will ensure
your computers can be found by DNS, and that the DNS doesn’t fill up with
useless lookup files. |
||||||||||||||||||||||||||||||||||||||
|
|
||||||||||||||||||||||||||||||||||||||
|
4.
You have to set up your clients to request IP
addresses. a.
Have your neighbor reboot into their version of
Workstation. b.
Go into the TCP/IP properties (Right click “My
network places” and select properties. Double click on local area connection.
Click properties. Double click on Internet Protocol (TCP/IP). c.
Click “Obtain an IP Address Automatically” |
||||||||||||||||||||||||||||||||||||||
|
5.
On the workstation, open the command prompt. 6.
Type IP config /all 7.
If your IP address starts with 169 and it says autoreconfiguration address then
something went wrong. Go back and check a few things: a.
Go into the properties of your network card and
ensure it says “Obtain IP address automagically.” b.
Go to the server and make sure there is a green arrow
on the server name. If it is red, it isn’t completely authorized. c.
Try restarting the server. 8.
Type ipconfig /release this will release the IP
address. 9.
Type ipconfig /renew this will do the DHCP request
process and obtain an IP address. 10.
Keep working on this until your workstation is
getting an IP address from YOUR server! Remember your scope? It must be
within those numbers so if your scope was 192.168.1.5-192.168.1.20 and the IP
address assigned is 192.168.5.4 then you’re getting an IP address from someone
else! 11.
Get a screen shot of your IP address, print it out.
Attach it to your lab report. Okay, now you’re REALLY done! |
||||||||||||||||||||||||||||||||||||||
|
Answer
the following questions by poking around your DHCP server 1.
Which IP addresses are currently leased? 2.
What is the MAC address of the computer that leased
the first IP in the list? 3.
Right click on one of the IP address leases and
release that address. What happens? 4.
Let’s set up a reservation. Click on reservations
and add a new IP address reservation of the address that ends with 192.168.yy.10.
Now how many IP addresses do you have available for leasing? 5.
Can you set up more than one address scope? |
||||||||||||||||||||||||||||||||||||||

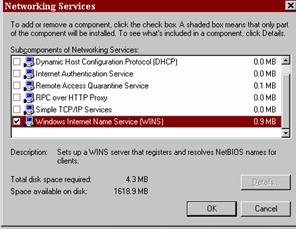
Lab 5-2 Installing WINS
Generally you don’t need a WINS server if your domain is all Windows 2000 or above, but just in case you have a Windows 98 floating around in there somewhere, let’s install WINS!
Let’s try a new way to install a service on Windows Server.
|
|
|
|
Click Networking Services and click the Details button. |
|
Scroll down and find Windows Internet Name Service (WINS) |
|
|
|
Click OK. Click Next. |
|
It’ll take awhile for WINS to install. You’ll probably need your disk. |
|
According to Microsoft, the default settings for the WINS server are all you need. There isn’t a lot of configuring you should do, although you can configure things if you need to. This would come with more advanced server management. |
|
Make sure your
workstation is registering on WINS |
|
Start up the workstation on your partner’s computer. |
|
Make sure it is set up to obtain an IP address from your DHCP server. |
|
Make sure it is obtaining an IP address from your server by either: m Checking the DHCP server to see if that computer name is getting an IP from you m Type ipconfig /all at the workstation command prompt to make sure the IP address is obtained from the correct scope |
|
Open your WINS server (it’ll be in the administrative tools on your server). |
|
In the console tree, select Active Registrations |
|
On the Action menu select Display Records. |
|
Click find now. |
|
The entire WINS database should show and in there you should be able to find your workstation’s registration. Do a print screen of this and attach it to your lab report. |
Lab 5-3 Exploring Operating System Functions
Observing
16-bit and 32-bit applications in Windows Task Manager
1. Click Start, and then click Run.
The Run dialog box appears.
2. In the Open drop-down list, type \\nettech05\labfiles\lab1, and then click OK.
The Lab1 window appears.
3. Double-click the following icons: Badapp32,
Spind16, and Spind32.
The Bad App,
SpinDIB:32, and SpinDIB:16 applications appear.
4. Minimize the Lab1 window, and arrange the desktop so that you can see the three
applications you started in the previous step.
5. In the SpinDIB:32 application, click the Open button.
The Open dialog box appears.
6. Double-click the Mcsekit.bmp file icon.
The Mcsekit.bmp
image appears in the SpinDIB:32 window.
7. In the SpinDIB:16 application, click the Open button.
The Open dialog box appears.
8. In the File Name text box, type \\nettech05\labfiles\lab1\mcsekit.bmp, and then click OK.
The Mcsekit.bmp
image appears in the SpinDIB:16 window.
9. Verify that the SpinDIB:32 and SpinDIB:16
applications are running by clicking the Spin! button in each application.
10. Click Start,
and then click Run.
The Run dialog box appears.
11. In the Open drop-down list, type taskmgr,
and then click OK.
The Windows Task
Manager window appears.
Four applications
appear on the Applications tab:
two SpinDB applications, Bad App,
and Lab1 (the Lab1 window).
12. Open the Processes tab, and then scroll down to the bottom of the list.
Many processes,
including Badapp32.exe, Spind32.exe,
and Spind16.exe appear in the list.
13. Why is Spind16.exe, along with Wowexec.exe, indented below Ntvdm.exe while Badapp32.exe
and Spind32.exe are not?
.
14. Open the Applications tab.
15. In the Task column, right-click SpinDIB:16 -
Mcsekit.bmp, and then click Go To Process.
The Processes tab becomes active, and Spind16.exe is selected.
The last two
steps demonstrated that Spind16.exe is
the active process of the SpinDIB:16 application.
16. Repeat the last two steps to complete the Process Name column of the following
table:
|
Application name |
Process name |
Application type |
|
SpinDIB:16 |
Spind16.exe |
Windows 16-bit |
|
Bad App |
|
Windows 32-bit |
|
SpinDIB:32 |
|
Windows 32-bit |
17. Open the Processes tab.
18. On the Option menu, click Show 16-Bit Tasks to clear this
option.
The Spind16.exe process and the Wowexec.exe process disappear from the
list on the Processes tab.
19. On the Option menu, click Show 16-Bit Tasks again so that 16-bit
applications appear in the list on the Processes tab.
Observing Halted Applications
Testing
the effects of a halted 32-bit Windows application
1. On the Options menu, click Always
On Top to clear this option.
2. In the Bad App application, on the Action pull-down menu, click Hang.
The fuse burns
down, and the bomb explodes.
3. Move the mouse pointer over the Bad App
window.
The mouse pointer
changes to an hourglass, demonstrating that Bad App is busy.
4. In Windows Task Manager, open the Applications tab.
Bad App shows a
status of Not Responding.
5. In the SpinDIB:32 and SpinDIB:16 windows,
click the Flip! buttons.
Why do both
applications continue to respond normally even though the Bad App application
is not responding?
6. In Windows Task Manager, verify that Bad App is selected, and then click the End Task button.
The End Program - Bad App dialog box appears, warning you that
ending the application this way will cause the loss of any unsaved data.
7. Click the End Now button.
The Bad App
application closes.
8. Leave the SpinDIB applications running, and
continue to the next procedure.
Observing
the results of GPF and halted applications
1. Restore the Lab1 window, and double-click the Badapp16 icon.
The Bad App
application appears.
2. On the Action menu, click GP-Fault.
When the fuse
burns down, the bomb explodes and a Badapp message box appears, stating that an
application error occurred.
3. Do not click the Close button or the Ignore
button.
4. In the SpinDIB:32 window, click the Spin! button.
The application
responds to the spin request.
5. In the SpinDIB:16 window, click the Spin! button.
The application
does not respond.
6. In the Badapp message box, click the Close button.
An Application Error message box appears.
7. Click the Close button.
8. In the SpinDIB:16 window, click the Spin! button.
The application
is now able to respond.
9. In the Lab1 window, double-click the
Badapp16 icon again.
The Bad App
application appears.
10. On the Action menu, click Hang.
When the fuse
burns down, the bomb explodes and the application halts.
11. Move the mouse pointer over the SpinDIB:16
window.
SpinDIB:16 does
not respond.
12. Move the mouse pointer over the SpinDIB:32
window.
The application
is running normally.
13. Using Windows Task Manager, close Bad App.
14. Move the mouse pointer over the SpinDIB:16
window.
m
The
application is running normally.
m
After
you halted Bad App, SpinDIB:16 was no longer responsive but SpinDIB:32 was.
m
After
you closed Bad App by using Windows Task Manager, SpinDIB:16 responded
normally.
m
Why
did hanging Bad App affect SpinDIB:16 but not SpinDIB:32?
15. Leave the
SpinDIB:16 and SpinDIB:32 windows open for the next procedure.
Running
shared and exclusive Windows On Windows Virtual DOS Machines (VDMs)
1. Click Start, and then click Run.
The Run dialog box appears.
2. In the Open drop-down list, type cmd, and then click OK.
A command window
appears.
3. At the command prompt, type start /separate
\\nettech05\labfiles\lab1\spind16.exe,
and then press Enter.
4. In Windows Task Manager, open the Processes tab.
A number of
processes appear, including two ntvdm processes.
5. Why are there two ntvdm processes running?
6. Close the copy of SpinDIB:16 that you
opened in step 3 of this procedure.
7. Close the command window.
8. Verify that the SpinDIB:16 and SpinDIB:32
applications you opened in Exercise 2 are still running.
9. Restore the Lab1 window.
10. Select the Spind16 icon.
11. On the File menu, click Create
Shortcut.
A Shortcut message box appears, stating
that a shortcut cannot be created in the Lab1 window but it can be created on the desktop.
|
Note |
You cannot create
a shortcut in the Lab1 window because your student account does not have write
access to this folder.
12. Click the Yes button.
The Shortcut To Spind16 icon appears on
the desktop.
13. Right-click the Shortcut To Spind16 icon, and then click Properties.
The Shortcut To Spind16 Properties dialog
box appears, and the Shortcut tab
is active.
14. Select the Run In Separate Memory Space check box and the Run As Different User check box, and
then click OK.
15. Double-click the Shortcut To Spind16 icon.
The Run As Other User dialog box appears.
16. Why did this dialog box appear?
17. Select the Run The Program As serverxx\administrator radio
button, and then click OK.
18. Verify that two ntvdm processes appear in
Windows Task Manager.
19. In the Lab1 window, double-click the Badapp16 icon.
The Bad App
application appears.
20. On the Action menu, click Hang.
The fuse burns
down, and the bomb explodes.
21. Check the status of both running copies of
SpinDIB:16.
22. Why is one copy of SpinDIB:16 not responding
while the other is?
23. In Windows Task Manager, close Bad App.
24. Close Windows Task Manager, the SpinDIB
applications, and the Lab1 window.
Attach screen
shots and the answers to the questions to your lab report.
Lab
5-4 Managing Users, Computers, and Groups in Windows 2003
|
Requirement |
Excellent (10) |
Incomplete (5) |
Not Attempted (0) |
|
Created OUs |
|
|
|
|
Created groups |
|
|
|
|
Created users |
|
|
|
|
Put users into proper OUs |
|
|
|
|
Set password policies |
|
|
|
|
Tested! |
|
|
|
|
Answer questions |
|
|
|
Partners will work together in their domain. One should start up in the server, and the other in workstation.
Active Directory allows you to manage users and computers in your domain. Through Active Directory you can create users, join them to groups, and put users and computers into organizational units for the purpose of apply group policies.
You can create the following in Active Directory:
|
Icon |
Object |
Description |
|
|
User |
A user object is an
object that is a security principal in the directory. A user can log on to
the network with these credentials and access permissions can be granted to
users. |
|
|
Contact |
A contact object is
an account that does not have any security permissions. You cannot log on to
the network as a contact. Contacts are typically used to represent external
users for the purpose of e-mail. |
|
|
Computer |
An object that
represents a computer on the network. For Windows NT-based workstations and
servers, this is the machine account. |
|
|
Organizational Unit |
Organizational
units are used as containers to logically organize directory objects such as
users, groups, and computers in much the same way that folders are used to
organize files on your hard disk. |
|
|
Group |
Groups can have
users, computers, and other groups. Groups simplify the management of large
numbers of objects. Group Scopes Distribution groups
are used for distributing emails in conjunction with an Exchange server. Security groups are
used to group users together and apply permissions on resources. Types of Groups A universal group is used primarily to grant access to resources in all
trusted domains. It can only be used as a security group. A universal group
can include members from any domain in the forest. In the Windows 2000 native
or Windows Server 2003 domain functional level, a universal group can be
granted permissions in any domain including domains in other forests with
which a trust exists. UGLY=Users
go into Global Groups, Global Groups go into Local Groups, Y? Because
Microsoft Says SO! |
|
|
Shared Folder |
A shared Folder is
a network share that has been published in the directory. |
|
|
Shared printer |
A shared printer is
a network printer that has been published in the directory. |
You are going to create a set of users and groups on your domain, test them, and then have me check it off.
- Open Active Directory Users and Computers.
- Expand your domain by clicking the +.
- Right
click on your domain name and create a new organizational unit. Name this
OU Kansas. Create two more OUs named
- Within these OUs you can create users, computers, and groups.
- Right
click on the OU “
- Right click on the OU Kansas and create a new group named Farmhands and another named Relations.
- Right click on the OU Oz and create a new group named Ozians. Create another group named Wizards and another named Bad Guys.
- You are now going to create some users. Before you create users you need to come up with a naming convention for your domain. Most companies use last name first initial. Others use first initial last name. You should decide your naming convention before you start typing them in. It’s a hassle to have to rename later.
|
First Name |
Last Name |
Username |
|
Dorothy |
Gale |
|
|
Toto |
Gale |
|
|
Scare |
Crow |
|
|
Tin |
Man |
|
|
Mayor |
Munchkin |
|
|
Lolli |
Pop |
|
|
Dandy |
Lion |
|
|
Wicked |
Witch |
|
|
T. |
Wizard |
|
|
Emily |
Gale |
|
|
Uncle |
Gale |
|
|
Huck |
Smith |
|
- Once you have chosen usernames, create new users in the correct OUs.
- In
i. Dorothy Gale
ii. Emily Gale
iii. Uncle Gale
iv. Huck Smith
- In
i. Lolli Pop
ii. Dandy Lion
iii. Scare Crow
iv. Tin Man
v. Mayor Munchkin
- Put the rest of the users in Oz
- Choose an easy to remember password for each user. Check the “User must change password at next logon” button. When the user logs in, he/she will be prompted to change their password.
- Organize your users into reasonable groups.
- Double click on Dorothy Gale
- Look through the different options for each user.
- Click the tab “Member of”. This will bring up the area where you can join a user to a group.
- Locate an appropriate group for each user that makes sense (you can figure out…you’ve seen the movie, right?)
Test it out!
On the workstation, log in as different users. Change the passwords when requested. Did it work? Yay!
Have me check off your users and groups when you are finished!
Questions
- What is the purpose of a group?
- Define Organizational Unit.
- How can you use groups to apply permissions to resources?
- Why use a standard naming convention?
- What is the difference between a distribution group and a security group?
Lab
5-5 Creating a Dfs Root
|
Requirement |
Excellent (10) |
Incomplete (5) |
Not Attempted (0) |
|
Create folders |
|
|
|
|
Create Dfs root |
|
|
|
|
Set access links |
|
|
|
|
Answered questions |
|
|
|
Objectives of lab (List what you learned on this lab)
|
|
|
|
|
|
|
|
|
|
|
|
|
|
|
|
Problems Completing Lab |
Create
a Dfs for Oz
- Create a shared folder on the root of
your server. (For example, if your server is on the E: partition, create
that folder there. E: is your root.) Name it Wizard.
- Share that folder
- Give everyone full control (for now).
You may change permissions later.
- On a second server in your network,
create a link:
- Create a folder named Oz
- Share that folder and give everyone
full control share permissions.
- Within Oz create three folders:
i.
Documents
ii.
Files
iii.
Programs
- On a third server, create another link:
- Create a folder named
- Share that folder and give everyone
full control share permissions.
- Within
i.
Documents
ii.
Files
iii.
Programs
- On a fourth server (or on your main
server if you only have three servers) create a folder named Munchkinland.
- Share that folder and give everyone
full control share permissions.
- Within Munchkinland create:
i.
Documents
ii.
Files
iii.
Programs
- Go back to your main server and install
Dfs (add a role). Once Dfs is installed, you’re going to create a domain
Dfs within your domain.
- Open Distributed File System
- Right click on Distributed File System
i.
Create
New root
ii.
Make it
a domain root
iii.
Choose
your domain
iv.
Find the
server your root folder is located on
v.
Give the
root a name like Wizard of Oz or The DFS root that wouldn’t die, or something
like that.
vi.
Locate
the folder you created and shared on your root (Wizard). Point to the Wizard
folder you created in your root of your partition. Use the pathname d:\wizard
(using the right drive letter).
- Add a link to your root
- Right click on your root.
- Select New Link
- Name it Oz
- Point to the Oz folder you shared using
the UNC pathname (example \\server2\oz)
- For comments, type “Yellow brick road”
(since that is, after all, the path to Oz)
- Repeat this for
- Assign the following permissions to
these folders
i.
Relations
Group Full Control
ii.
Munchkin
Group Read Only
iii.
Oz Group
Read Only
- Oz
i.
Oz Group
Full Control
ii.
Munchkin
Group Read Only
iii.
Kansas
Group Read Only
i.
Munchkin
Group Full Control
ii.
Kansas
Group Read Only
iii.
Ozians
Group Read Only
- Create Replication Partners
- On Server1 create a folder named Oz.
You aren’t going to put anything in there, when you create the
replication partner it will grab the folders from the original Oz.
i.
Share
this folder as Oz (make sure it’s on a different
server than your original Oz.
ii.
Go into
Dfs and right click on your Oz link and select New Target
iii.
Type in
the UNC path to the new Oz (i.e. \\server1\oz)
iv.
It’ll
tell you the target cannot be replicated until replication is configured. Click
yes.
v.
Select
the default target as initial master (that means this is where the files will
be replicated FROM, the other is the files where they will be replicated TO).
vi.
For
topology select Mesh. That way if you put files in either folder, they will be
replicated to the other. (If you want one to be the master and replicate to the
other, you’d select hub and spoke.)
vii.
Click
finish.
- Repeat this for the other two, making
sure the new folders you create are on different servers from their
links. (In other words, if you put
- Test is out!
- Log in as one of the users and try to
access a folder that they have read only access to. What happens?
- What happens when you try to create a
file there?
- Why?
- Log in as Dorothy Open up \\server\oz\kansas and create a
file named “Toto Rules!”. Open your Distributed File System on your
server. Find the
- Why or why not? If not, troubleshoot
and figure out why replication isn’t happening.
- Answer
the questions.
- If Dorothy were to browse the Dfs root
through My Network Places, draw a picture of the folder tree that she
would see (include all folders).
- All of the folders that “go” with
- Why would you want to do that? What
benefit does it have to your users?
Lab
5-6 Policies
Have me check off the requirements below. Fill out the information on the second part of the lab report. Turn this in if you would like credit on this lab.
Policies
allow you to control how your users access things in the domain. There are TONS
of policies you can set in Windows Server 2003!
- Go into Active Directory Users and Computers.
- Create a new OU named Lab5-6
- Create a user named Policy User with a username of PUser.
- Right click on your OU and select properties.
- Click the Group Policy tab.
- Create a new policy named Lab5-6.
- Edit this policy.
- Note:
- Computer configuration policies apply to your computers. I.E. you
could set up an OU called “Kiosks” and set the shell for your kiosk
computers that customers surf on in the lobby of your business to
iexplore.exe, have a specific website, set Internet Options to high
security, deny access to logoff, etc.
- User configuration policies apply to your users. Here you can control
things like proxy servers, wallpapers, etc. Lots of fun stuff!
- You’ll find your best settings in Administrative Templates.
Turn on both your workstation and your servers for this lab.
Complete this lab on your own.
1. I want you to set five computer policies and five user policies that were not set in the last lab. Apply these policies to a new organizational unit named “Policy Practice”. Each partner should choose five different policies to set. Just make sure they don’t conflict!
2. Create a document in Word or Excel. For each these policies, tell me:
a. What the policy is.
b. What the policy does.
c. How this policy affects users.
d. How this policy ensures security.
3. When you have finished, create a new user within Policy Practice named Lab122b. Have Lab122b test all of your policies to ensure they are working.
4. To test computer policies, you will have to move the computer account for your workstation into the Policy Practice OU.
5. Have me check off your lab ONLY after you have completed the writing part of the lab.
|
Requirement |
Excellent (10) |
Incomplete (5) |
Not Attempted (0) |
|
Set five computer policies. |
|
|
|
|
Set five user policies. |
|
|
|
|
Wrote explanations for each of the ten policies. |
|
|
|
|
Created new OU |
|
|
|
|
Moved computer account into the OU |
|
|
|
|
Created a new user |
|
|
|
|
Tested policies |
|
|
|
Objectives of lab
|
|
|
|
|
|
|
|
|
|
|
|
|
|
|
|
Problems Completing Lab |
Lab
5-7 EFS
The
Encrypted File System can be used to encrypt files that are for your eyes only.
It must be turned on at the server to allow it to work. Be Warned! EFS
can mess you over BIG time if you turn it on and users encrypt stuff then
leave! While the administrators can decrypt files, if the domain has changed
(been reinstalled) since EFS was turned on and the file was encrypted, you
might lose the data forever.
That
would be sad.
|
Requirement |
Excellent (10) |
Incomplete (5) |
Not Attempted (0) |
|
Accessed Task Scheduler |
|
|
|
|
Set up backup task |
|
|
|
|
Had teacher check off created task |
|
|
|
|
Deleted the task |
|
|
|
|
Filled out objectives of lab |
|
|
|
|
Answered all questions on this sheet |
|
|
|
Objectives of lab (List what you learned on this lab)
|
|
|
|
|
|
|
|
|
|
|
|
|
|
|
|
Problems Completing Lab |
First turn on EFS in your Active Directory:
To set Group Policy
|
1. |
Click through the following path:
|
||||||||||
|
2. |
Select Properties |
||||||||||
|
3. |
Select check from the check box to enable
EFS as shown in Figure 11 below. |
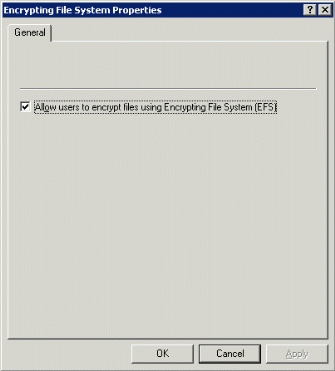
Figure 11: . Disabling EFS using Group Policy
Take the following
steps to use Encrypting File System (EFS) to manage data encryption:
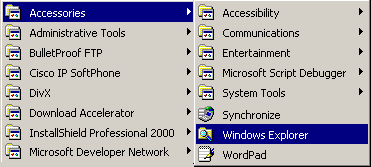
- Run Windows Explorer from Start Menu > Programs >
Accessories > Windows Explorer.
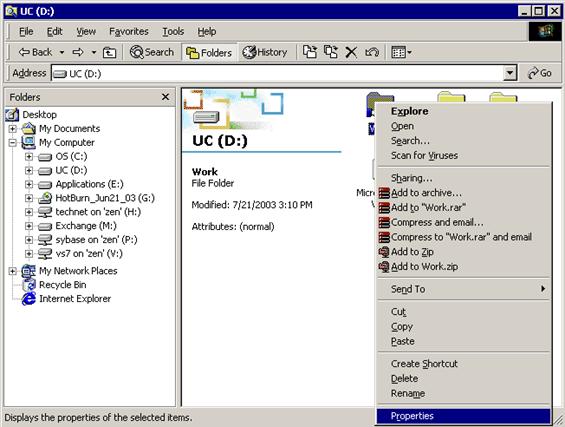
- In Windows Explorer, click the (D:) drive in the Folders section.
In the details pane of Windows Explorer, right-click the folder to be encrypted,
and click Properties.
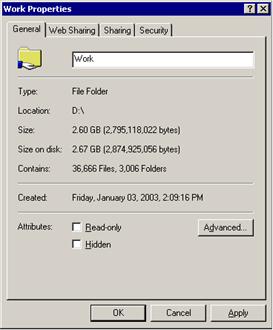
- On the General tab page of the <foldername> Properties
dialog box, click the Advanced button.
- In the Compress or Encrypt attributes section of the Advanced
Attributes dialog box, select the Encrypt contents to secure data check
box, and click the OK button. Note…you
can compress OR you can encrypt.
You can’t do both!
- On the General tab page of the <foldername> Properties
dialog box, click the Apply button. A confirmation dialog box will appear.
- In the Confirm Attribute Changes dialog box, specify folders to
which these settings will apply, and click the OK button.
- Close the
<foldername> Properties dialog box.
Show
Encrypted Files in Color
The Windows XP client now
allows both encrypted and compressed files to be displayed with alternate
colors in Windows Explorer. This feature is enabled by setting folder options
which can be found in Windows Explorer by selecting Tools and then Folder
Options in the command menu.
To show encrypted files
in color
|
1. |
Select the View
tab in the Folder Options dialog box |
|
2. |
Check the box for Show
encrypted or compressed NTFS files in color as shown in Figure 20 below. When
this is applied to a folder, all encrypted files will be displayed as green
in Windows Explorer. |
|
3. |
If you would like to have
this setting apply to all folders on the machine, select the Apply to All
Folders button and choose Yes when prompted. |
|
4. |
Click OK to close the
dialog box. |
Complete
the following:
1. Create a new user called EFS user. Give him a
password.
2. Turn on the EFS file system.
3. Log into the workstation as that user.
4. Have that user create a folder named EFS1.
5. Set encryption on contents of folder.
6. Create three files within that folder (file1, file2,
file3).
7. Create another folder (not within EFS1) named EFS2.
8. Create three files within that folder (encrypted,
not encrypted, chicken lips).
9. Encrypt chicken lips and encrypted.
10. Show me!
Oh no! EFS User has been
fired! Before he left he encrypted EVERYTHING in his folder and the new guy who
took over can’t open anything!
1. Create a new user named New Guy.
2. Give New Guy full control to the folders EFS1 and
EFS2.
3. Log in as New Guy. Locate those folders. Can he open
anything?
4. Log in as administrator and locate the files. Can
you open the encrypted ones? Why or why not?
5. Right click on the file and decrypt it. Did it work?
If you set your EFS policy correctly and you are an administrator in the
domain, it sure should have!
Questions:
1. What is the purpose of the EFS?
2. Why is it turned off by default?
3. Who can decrypt an encrypted file?
4. What happens if EFS user leaves and encrypts
everything in his folder, wreaking havoc upon your business?
Lab
5-8 Printer Rights
|
Requirement |
Excellent (10) |
Incomplete (5) |
Not Attempted (0) |
|
Create printer share |
|
|
|
|
Create TCP/IP port |
|
|
|
|
Set printer rights |
|
|
|
|
Create printer pool |
|
|
|
|
Change print priorities |
|
|
|
|
Reassign printing ports |
|
|
|
Objectives of lab (List what you learned on this lab)
|
|
|
|
|
|
|
|
|
|
|
|
|
|
|
|
Problems Completing Lab |
You are going to give
your users rights to your printers. Rights allow them to DO things. In this
case, we’ll use printers.
Create
a printer share
a. Create a new TCP/IP port: 192.168.1.171
b. Printer: HP 1300n
2. Give the following users rights:
a. Munchkin group: print
b. Ozians: Manage printers
c. Administrators: Manage documents
3. Pause your printer share (right click-->pause)
4. Log into your workstation as a Munchkin. Have him
print something.
a. Try to delete that file from the print queue.
b. Does it work? Why or why not?
5. Log in as an administrator.
a. Try to delete the file from the print queue.
b. Does it work? Why or why not?
c. Restart printing.
Create
a Printer Pool
1. Go into your printer share.
2. Create a new TCP/IP port. Give it an IP address in
the same subnet as the other printer.
3. Enable printer pooling.
4. What kind of printer does this have to be if its in
a printer pool?
5. What happens to print jobs if the first printer dies?
6. What happens to print jobs if the first printer is
tied up with a great big job?
Change
priorities on printers
1. Create a second printer share just like you did in
the first exercise.
2. Name it Admin Printer.
3. Give it the same IP and use the installed HP driver.
4. Go into printer properties and set the priority of
this printer so that it will print BEFORE the other printer if there is a
fight.
5. Go into the other printer and change the priority so
it will print after.
6. What priority did you set on Admin Printer?
7. What priority did you set on the other printer?
8. If you and a neighbor send a print job at the exact
same time, you send it to Admin Printer, he sends it to the other printer, what
will happen?
Fake
a broken printer
1. Create a new printer share
a. HP Printer
b. IP port: 192.168.1.87 (this port will not work, but
go ahead and create it anyhow).
2. Install the printer on your workstation.
3. Send a file to print to this printer. It should just
kind of sit there. (Just do a document with your name on it.)
4. Go into your share
a. Add a new port: 192.168.1.171
b. Enable printer pooling
5. What happens? (Go to the printer to see if it
printed.)
6. This is what you do if a printer fails, but you’ve
got documents that must print in the queue.
Name(s): ___________________________________________________
Lab
5-9 Profiles
Have me check off the requirements below. Fill out the information on the second part of the lab report. Turn this in if you would like credit on this lab.
In this lab you are going to set a roaming mandatory profile for a group of users.
1. Create a new OU and name if “Profile Practice.”
2.
Create five new users within that OU and name
them Sateen, Christian, Duke,
3. On your server, create a folder in YOUR %systemroot% named “Profiles”. Share this folder.
4. In your workstation, log in as Zidler and do the following:
a.
Change the color scheme to
b. Change the backdrop to coffee.
c. Create a shortcut on your desktop named “Moulin Rouge.”
d. Create a text document in the “My Documents” folder and name it “Chocolat”.
5. Log off. Log on as administrator.
6. Right click on “My Computer” and select “Policies.”
7. Set Zidler’s profile to roaming.
8. Copy the profile to the Profiles folder you created on your server.
9. On your server go into the Profiles folder and open up Zidler’s profile. Find NTUser.dat. Rename it to NTUser.man. (You may have to show hidden files to do this.) Set the security on Zidler to be allow everyone to read.
10. Now, go into Active Directory Users and Computers. Open up Christian. Click on the Profile tab and type in the profile patch, which should be \\yourservername\profiles\zidler.
11.
Do this same thing for the Duke and
12. On your workstation, log in as Duke and change the background. Log off.
13. Log back on as Duke. Is your background still changed? Why or why not?
14. If your background changed, check to make sure you followed the directions carefully.
15. Log in as Sateen. Change the background. Log off. Log back on. Is your background changed? Why or why not?
16.
Test with
17. Shut down your server. Now on your workstation, try to log on as Zidler. Did it work? Why or why not?
18. Try to log on as Sateen. Did it work? Why or why not?
19. Answer the questions below.
|
Requirement |
Excellent (10) |
Incomplete (5) |
Not Attempted (0) |
|
Created new OU |
|
|
|
|
Created five users |
|
|
|
|
Set up desktop |
|
|
|
|
Made profile roaming |
|
|
|
|
Made profile mandatory |
|
|
|
|
Set profile paths for users |
|
|
|
|
Tested profiles |
|
|
|
|
Shut down server and tested profiles. |
|
|
|
Objectives of lab
|
|
|
|
|
|
|
|
|
|
|
|
|
|
|
|
Problems Completing Lab |
- How do you make a mandatory profile?
- What happens if you change a mandatory profile as a user?
- How do you make more than one user use the same profile?
- What happens if the server is down when a user with a mandatory profile tries to log in?
Unit
Project
Module: Networking Protocols and Services
|
Description of Problem |
||||||||
|
You
are a curriculum development team hired by an educational firm to create a
protocol lesson package that can be sold to schools and vocational programs
(in college and high school) throughout the You will be doing this project on TCP/IP. You must
include all of the protocols below
|
||||||||
|
Current Needs |
||||||||
|
Your package
should include: ·
A poster of the OSI model showing which protocol works at which
level. The poster should be informational and describe the role or function
of each protocol. ·
A manipulative that teaches the protocol stack, what protocols work
within the stack, the function of each protocol, and how they relate to the
OSI model. Include instructions on how to use the manipulative with students. ·
A written pamphlet/booklet with information the trainer needs to know
in order to teach each protocol stack. Assume the teacher has no prior
knowledge. It should be easy to read, simple to navigate, and contain
complete information. ·
An assessment piece. This should be a “test” of some format. It
should contain no less than 25 questions and should test how much the student
learns using the manipulative. ·
A thorough demonstration of the package, including how to use the
manipulative, what is contained in the packet, and how the protocols work. We
will all set up our “packages” and demonstrate to potential clients on the
same day. |
||||||||
|
Interviews with employees |
||||||||
|
Honestly,
I just don’t “get it.” I understand the purpose of a protocol, in general,
but I am having a hard time remembering what each one does, where it fits on
the OSI model, etc. I need something to not only help me learn the
materials…so make the documentation thorough, but I also need something fun
that the kids can play. I’m
not looking for flip memory cards, or something simple. I’m looking for
something that kids would like…on the computer is great. Board games are fun.
No card games, they just don’t get into that. Then
so they’ll remember their information, I need colorful posters to hang on the wall. If the poster is
interactive, it’s that much better. I’d do it myself, but who has time.
Besides, that’s why I’m paying your company the big bucks! |
||||||||
|
Expansion plans/Future needs |
||||||||
|
They
are hoping to expand their understanding of protocols dramatically so please
be sure to include a list of resources for more information so that, in the
future, they can get more in-depth. |
||||||||
|
Your Requirements |
||||||||
|
Task One: Develop a list of
terms/jargon to be defined for the customer. Define the jargon. |
||||||||
|
Task Two: Develop a list of
questions that must be answered before you can begin your research. |
||||||||
|
Task Three: Develop a list
of current customer needs. |
||||||||
|
Task Four: Develop a list of
future customer needs. |
||||||||
|
Task Five: Research
solutions to the problems and develop a solution to present to the customer. |
||||||||
|
Task Six: Keep a list of
resources consulted as you go. It will be part of your portfolio |
||||||||
|
Task Seven: Create a
spreadsheet of prices to the solution, if applicable. |
||||||||
|
Task Eight: Emulate the
solution on your system. |
||||||||
|
Deliverables |
||||||||
|
m
Jargon list |
||||||||
|
m
Questions |
||||||||
|
m
Current needs |
||||||||
|
m
Future needs |
||||||||
|
m
Solution,
including graphics and drawings as necessary |
||||||||
|
m
Resource list |
||||||||
|
m
Solution set up
on server, computers, etc. as appropriate |
||||||||
Grading Rubric For
Project
Item
|
10 |
8 |
6 |
4 |
0 |
Poster—Design
|
Poster is eye catching and
colorful. Poster contains graphics which lend to the enhancement of the
topic. There are zero spelling or grammatical errors. Poster could be used in
a classroom as an educational enhancement. |
Poster is eye catching and
colorful. Poster contains graphics, although the graphics may not enhance the
subject matter. There are no more than two spelling errors or grammatical
errors. Poster could be used in a classroom with some modifications. |
Poster contains information
pertaining the subject. There are more than two spelling or grammatical
errors. Poster could not be used within a classroom without a major overhaul. |
Poster is of poor quality.
Contains no graphics. Poster has a number of errors. |
Not
observed |
|
Poster—Information |
Poster clearly defines all
layers of the OSI model. Poster identifies correctly all protocols which work
at corresponding levels of the OSI model. Information is concise and clear. A
student could use this poster to help his/her understanding of protocols in
relation to the OSI model. |
Poster clearly defines all
layers of the OSI model. Poster identifies some or most of the protocols
which work at corresponding levels of the OSI model. Information is wordy and
in some places difficult to understand. A student could use this poster to
help his/her understanding of protocols with some modifications. |
Posters is missing important
information in relation to the layers of the OSI and corresponding protocol
stacks. Information is difficult to understand or incomplete. Poster would
not be an educational aid without major revisions. |
Information is inaccurate or
sorely incomplete. |
Not
observed |
|
Maninpulative—Educational Content |
Educational content of
manipulative is complete. All protocols are clearly outlined in some manner.
Functions of each protocol are clearly outlined. All information is accurate
and factual. Shows a clear understanding of protocol relationships. This
could be used in a real classroom setting. |
Educational content of
manipulative is complete with minor exceptions. (No more than 1 or 2
protocols are missing. Functions of protocols are outlined and easily
understood with a little research. Shows an understanding of most of the
concepts of protocol relationships. With modification, this could be used in
a real classroom setting. |
Educational content of
manipulative is incomplete. Relationships between protocols and networking is
unclear. The student shows the beginning of understanding the concepts, but
does not grasp them well enough to teach them. This could not be used in a
real classroom as is, but might be the beginning of a great idea. |
Information is inaccurate or
incomplete. Relationships are not clearly defined. Student shows little
understanding of protocols and networking. |
Not
observed |
|
Manipulative—Appeal |
Manipulative shows creative
use of color and style. It is attractive to the eye and visually engaging. It
makes you want to pick it up and/or explore it further. |
Manipulative is creative and
engaging. It looks more like a prototype than a finished project. It has a
great deal of promise to be an interesting and engaging activity. |
Manipulative is flat,
uninteresting, or lacks creativity. Most students would overlook it. It has
little visual appeal. It appears to still be in the planning stages. |
Manipulative is incomplete. |
Not
observed |
|
Pamphlet—Written information |
Pamphlet clearly outlines
educational content the teacher must know to use the manipulative correctly
with his/her class. It also contains complete directions for using the
manipulative. It clearly states the authors/creators of the packet. |
Pamphlet is informational
and informative. Content is complete, but may not be clear, or may read as if
it was taken from a textbook. Directions for using the manipulative are
incomplete or confusing. It clearly states the authors/creators. |
Pamphlet is incomplete
and/or contains erroneous information. Directions for using the manipulative
are missing or confusing. The authors/creators are clearly identified. |
Pamphlet is incomplete.
Information is either no present of wrong. Important concepts are missing.
Instructions on how to use the manipulative and/or information needed to
teach the topic are missing. |
Not
observed |
|
Demonstration |
Describes clearly,
concisely, and completely: ·
The parts of the
individual curriculum packet. ·
How to use the
packet with your students. ·
Guides student
audience through one “round” or session of using the manipulative. ·
Assists students
in their learning. ·
Delivers the
assessment piece. |
Describes completely with
two or less omissions: ·
The parts of the
individual curriculum packet. ·
How to use the
packet with your students. ·
Guides student
audience through one “round” or session of using the manipulative. ·
Assists students
in their learning. ·
Delivers the
assessment piece. |
Missing important components
of the descriptions. Information is unclear or erroneous. Demonstration shows
a blossoming understanding of protocols and protocol stacks, but lacks
clarity. |
Demonstration shows little
understanding of protocols and protocol stacks. |
Not
observed |
|
Spelling |
There are no spelling
errors. |
Less than ten spelling
errors. |
More than ten spelling
errors. |
|
|
|
Quality of print material |
Material is neatly
organized, typed, and formatted for ease of reading. All issues are
addressed. Headings are provided to easily guide the reader to specific
sections. Papers are securely fastened together. Pages are numbered, and
students’ names appear on each page. |
Material is typed and
organized. All issues are addressed, but reader must “dig” to find
information. Papers are securely fastened. Pages are numbered and students’
names appear on each page. |
Material is not typed and
shows little or no organization. |
|
Not
observed |
|
Quiz |
Quiz contains 16-20
questions which are clear, correct, simple to understand, and test the
concepts taught by the manipulative. They must contain at least four of each
of the following: multiple choice, scenario, fill in, matching. Quiz is typed
and a clear key is included. |
Quiz contains 16-20
questions which test the concepts taught by the manipulative. No more than
one or two “throwaway” questions are included. A variety of question types
are included (see 5 point box). Quiz is typed with no more than two errors
and a key is included. |
Quiz contains 10-16
questions which test the concepts taught by the manipulative. Quiz contains
questions that are not high level enough to actually quiz the concepts.
(Answers are vague or given in the question or later on the quiz.) Quiz is
typed, but contains errors. |
Quiz is incomplete or
quickly thrown together at last minute. Little or no organization is shown.
Concepts are not tested. |
Not
observed |
|
Teamwork |
All members showed equal
understanding and contribution. |
Some members worked more
than others. |
One or two members did much
of the work. |
|
|
|
Total |
|
______/100 |
Total
X 4= |
|
|
|
Team Members |
|
|
1 |
|
|
2 |
|
|
3 |
|
|
4 |
|
|
Best thing about
the package |
|
|
What still needs
some work |
|
Would you buy this educational package? Notes on why or why not?