|
Do this
|
It’ll look like this
|
- Create a New Virtual Machine.
- Name it FEDORA
- Set memory at 1000MB
- Select legacy network adapter and connect
it to External Net
- Make the VHD 10GB and save it with your other
VMs.
- Be sure to capture the DVD drive, or you can
capture the ISO.
- Get a Fedora 10 DVD from me.
- Pop the DVD into the drive. If you do not
have a DVD drive, capture the ISO.
|
- Start your new server. It will boot into
Fedora Live.
- It will boot into Fedora and automatically
log in using some sort of Linux voodoo.
- Wow look! It’s already installed! No, not
really. This is a LIVE disk. That means you can test the OS before you
actually install it, or use it for recovery of data on other computers.
Very handy. Not all LIVE disks can also install the OS, but this version
of Fedora can. Sweet!
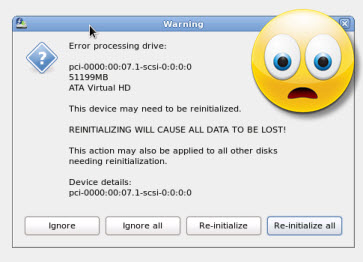
- You can poke around in Fedora and “try before
you buy’ but let’s just install it into our virtual machine.
|
|
- Double click “Install to Hard Drive” (this
makes it somewhat idiot proof).
- Click next
- Select English for your language, or if you
do speak another language, knock yourself out!
- You can install to SCSI drives or even SANs
(Storage Area Networks) but we’re going to just install to a Basic disk.
- It will examine your storage devices…(whistle a bit).
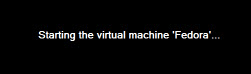
- Oh Em Gee! Danger
Will Robinson! There is an error on your ADA drive! Panic! Clutch your
throat in fear! Or just tell it to reinitialize because the drive isn’t
formatted. We just created it.
|
|
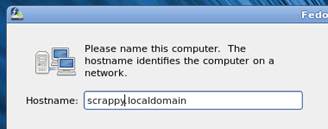
- Name your computer, but leave “localhost” there (see my example).
- Select Los Angeles as the time zone.
- Set the root password to p@ssw0rd. It will
warn you that it is weak. Tell it that IT is weak and this is just a
lab, and set it.

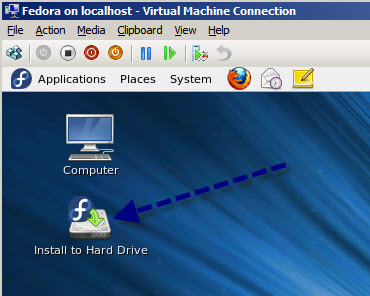
- Write changes to disk. It is going to format
your drive and do all sorts of fun things.
|

|
- It’ll say Activating New Partitions
then Formatting / file system…etc.
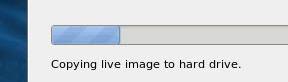
- It’s going to copy the entire Live disk to your hard drive. Nifty!
- It’ll take awhile…sit back, relax, or go
answer the questions in your other labs.
 - When it’s done, close and go under the system
menu and shut down.
- Select restart.
- While it is restarting, uncapture
the D: drive or ISO so you don’t restart in the live version. I had to
turn off the virtual machine to eject.
|
|
- Restart. Click forward. Accept the EULA. Nice
and short…never saw a EULA that short!
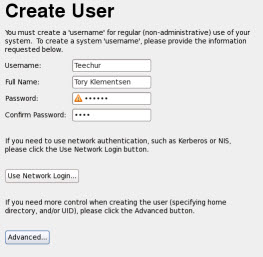
- Create a user (you). This will NOT be an
administrator.
- You won’t create a network login. Nothing
advanced.
- Go ahead and let it get the date and time
from the network. Now it might not work at first because you may not yet
have network connectivity, but it will once you get that.
- NTP=Network Time Protocol and it allows your
computer to get time from a server that will automatically update time
and date.
- Don’t send your hardware profile. No really,
do not send.
- It will look like the screen freaks out and
then restart. This is normal. It scared me the first time too.
- Log in as the user you created.
- The first thing that will happen when you log
in is you will get a security alert. Totally normal. Linux updates a
LOT! We’re not on the interwebs yet, so not to
worry.
|
|
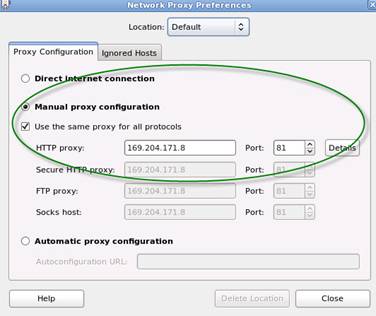
- Let’s set the proxy server. You can set it
using configuration files in terminal (more on that later), or Fedora makes
it easy.
- SystemàPreferencesàSystem Proxy
- You CAN use different proxies for different
protocols, but we’re going to use the same one for all protocols.
- Type in our proxy.
- Now let’s go into Firefox and make sure it
can get online.
- If you get the error, Proxy refused
connections (or something like that), do the following.
- Double check your proxy settings. This
SHOULD apply out to all programs.
- Go into Firefox and manually set the proxy
in there. Try again.
- Bust out the SUPER USER account!
i.
Go into
applicationsàsystemàterminal
ii.
At the prompt
type su -
iii.
At the next
prompt type the password p@ssw0rd
iv.
You are NOW in
super user, or administrative mode.
v.
Type ifconfig and check that you’re getting an IP address. If you are, type chkconfig
vi.
A big list
will show up. Look for IRQbalance (these are
all services). If it says “on” we want to turn it “off” so type chkconfig irqbalance off.
vii.
Try again
viii.
|
|
- You may have to go into the network interface
to set up DNS servers. I had to to make it
work, although you should be able to get it from the DHCP servers.
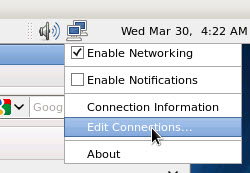
- Right click on the icon and select Edit
Network Connections.
- You will see a familiar looking box pop up.
- Click eth0 and select edit.

|
|
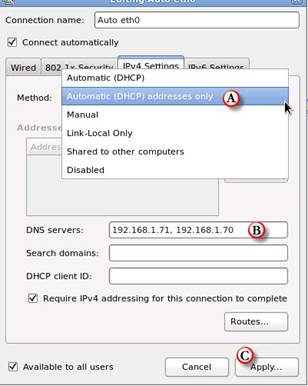
- Click IPv4 settings
- Click and drag to Automatic (DHCP) addresses
only (A).
- Go down to DNS servers and type in the IP
address of our servers, separated by a comma (B).
- Click apply (c).
- Go into Firefox and try again.
- If the icon for the network card shows a red
x, restart the VM. For some reason I find that fixes things.
|
|
|
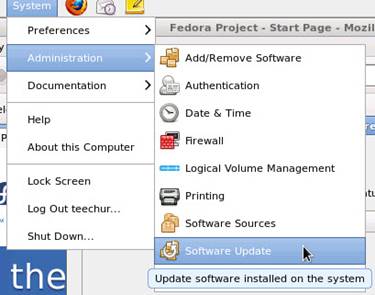
- Check for updates from under the system menu.
Install any updates.
- I just downloaded this version on 3/29/2011
so likely there are no updates, but we should check anyhow.
- Go under preferencesàsoftware update preferences and set it to update daily and install
security patches automatically.
|
|
- Let’s set up your web server.
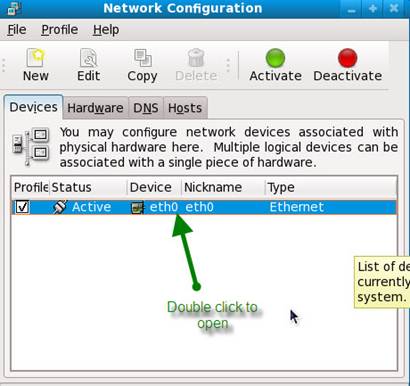
- Open up your Network properties. Web servers
require a STATIC IP address. SystemàAdministrationàNetwork
Connections (it won’t look the same
as the one to the right, it’s an old picture).
- A window will pop up asking for your
administration password. Remember the root password you set? Use that.
- In the Network Configuration box you’re going
to select your network card. Double click on Active eth0 (stands for
Ethernet card 0).
- Select Statically
set IP addresses.
- Remember the addresses you assigned in an
earlier lab? Assign based on that addressing scheme based on YOUR
network.
|
|
- Play around with it for a little while. Don’t
make any major changes, just change the desktop maybe download a few fun
things.
- Have me check off that you’ve installed
Fedora and it is running on your machine. We’ll put it into your network
later on.
|
|
|
|
|