Name:
_______________________________________________________
Individual Linux Unit
Linux
Lab Checkoff
|
`Lab |
Excellent |
Needs
Work |
Incomplete |
|
|
Lab
L-1 Installing Linux |
||||
|
|
|
|
|
|
|
|
|
|
|
|
|
|
|
|
|
|
|
|
|
|
|
|
|
|
|
|
|
|
|
Lab
L-2 Using YUM |
||||
|
|
|
|
|
|
|
|
|
|
|
|
|
|
|
|
|
|
|
|
|
|
|
|
|
|
|
|
|
|
|
Lab
L-3 Install Apache |
||||
|
|
|
|
|
|
|
|
|
|
|
|
|
|
|
|
|
|
|
|
|
Lab
L-4 Creating Users and Folder Permissions |
||||
|
|
|
|
|
|
|
|
|
|
|
|
|
|
|
|
|
|
|
|
|
Lab
L-5 Linux Basics |
||||
|
|
|
|
|
|
|
|
|
|
|
|
|
|
|
|
|
|
|
|
|
|
|
|
|
|
|
|
|
|
|
Lab
L-6 Creating a Website |
||||
|
|
|
|
|
|
|
|
|
|
|
|
|
|
|
|
|
|
|
|
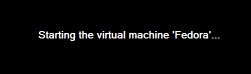
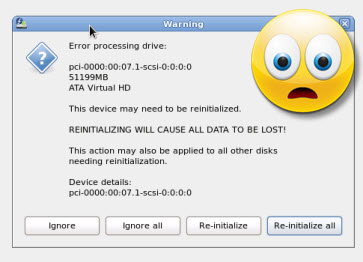
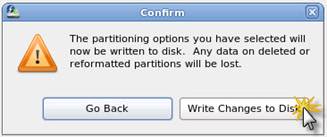
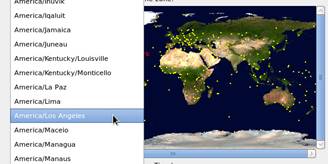
Lab L-1 Install Linux Server in your Network
|
Do this |
It’ll look like this |
|
|
||
|
|
|
|
|
|
|
|
|
|
|
|
|
|
|
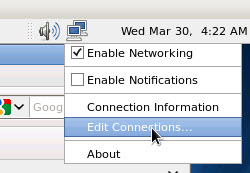
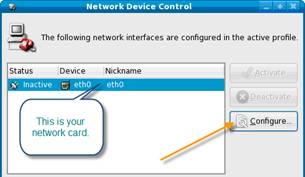
i. Go into applicationsàsystemàterminal
ii. At the prompt type su -
iii. At the next prompt type the password p@ssw0rd
iv. You are NOW in super user, or
administrative mode.
v. Type ifconfig and check that you’re getting an IP address. If
you are, type chkconfig
vi. A big list will show up. Look for IRQbalance (these are all services). If it says
“on” we want to turn it “off” so type chkconfig irqbalance off.
vii. Try again
viii. |
|
|
|
|
|
|
|
|
|
|
|
|
|
|
|
|
|


Questions to
look up from your browser in Linux:
- Who created LINUX and why?
- What is the name of the mascot?
- Who currently “owns” Fedora?
- List three websites you can go to
for more information about linux.
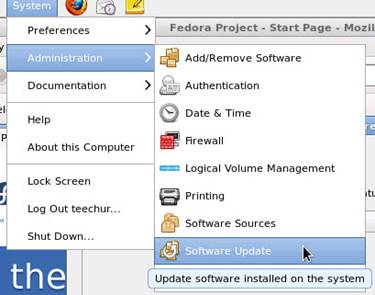
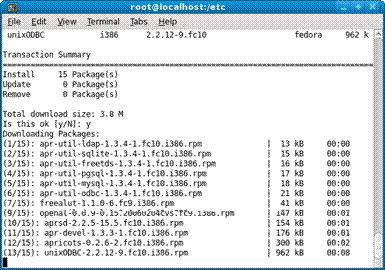
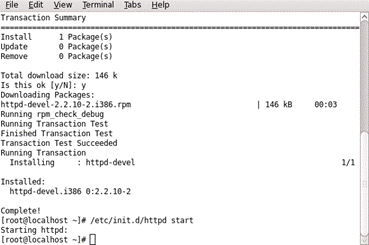
Lab L-2 Working with Yum
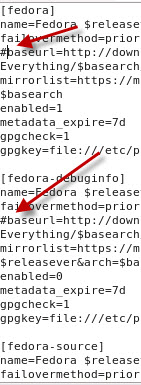
YUM is a
package management system for Linux. It’s used to install packages (programs)
from the command line. YUM is used to install RPM packages (*.rpm). YUM stands for Yellow Dog Updater Modified.
Yum works by
looking in “repositories” which are basically computers that serve a buncha files. They may be mirrored (copies of the entire
directory on another computer in the interwebs). The
good thing about this is that the program (YUM) can look in other computers if
for some reason the repository is down or too busy. There
ARE some errors you may get, so read ALL of the directions.
A few notes:
/etc/=a directory that holds configuration files
and directories
.conf=a configuration file, so yum.conf
is the yum configuration file
Su - = logging in as Super User (tada). You have to be logged in as SU in order to change
these files.
Most commands are unix commands, but some dos commands work. If all
else fails, ask for help!
# = a comment in a configuration file. You can
“comment” out a line by putting a # in front of it.
|
Do this |
It’ll look like this |
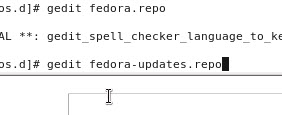
|
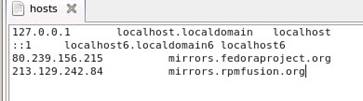
Yum.conf
file
|
80.239.156.215 mirrors.fedoraproject.org 213.129.242.84 mirrors.rpmfusion.org
|
|
Note: If there is an error when installing a package, you can simply
restart the installation. YUM will determine what parts have already been
installed and pick up the other parts from another mirror. When I installed
KDE it did not fully install. I just ran the command again, it grabbed the
two RPM packets that didn’t download, and I was in business! If it says it is not installed, rerun the
installer. That happened to me EVERY time I installed it. While it’s installing, go to http://www.kde.org/
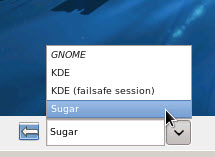
and take a look at the features of KDE Plasma Desktop. After you log back in it will look very similar, but start poking
around under menus and you’ll see…nope, it’s added all sorts of new and
exciting things to your desktop and programs! Answer the questions here:
|
K Desktop Environment works with widgets. It’s cool, too. |
|
One of the
benefits of open source is that you can get programs ported to other
languages, such as Swahili. |
|
|


Questions
- What is YUM?
- What is an RPM?
- What is the hosts file?
- What is a .conf file?
- What is a baseurl?
- What is a .repo file?
- What is the command if you wanted
to install a program named Tory_Rocks?
- How do you switch between KDE and
GNOME?
- What is GNOME?
- What is KDE?
- What are three differences you
see between those two desktop environments?
- If you’re installing something
via YUM and one of the download mirrors goes down, what do you do?
Lab L-3 Installing and Configuring Apache Web Server
Apache is an open
source webserver that has been around for years and
is used both on Linux and Windows boxes throughout the world. It is simple,
straightforward, and robust without all the bells and whistles of Windows
Internet Information Services.
You can install a
simple HTTP server, or you can get really fancy and allow it to host dynamic webpages, databases, etc. The sky is almost the limit with
Apache!
We installed Apache
in our initial installation of
|
Do this |
It’ll
look like this |
|
|
|
|
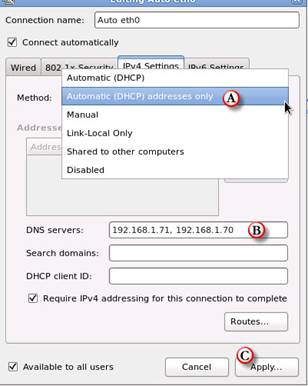
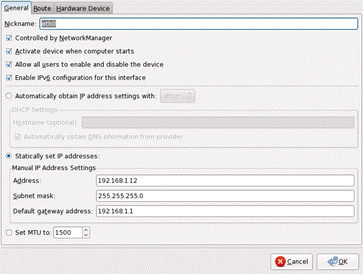
4 Activate device when network starts 4 Statically set IP Address settings
|
4 Subnet mask: 255.255.255.0 4 Choose YOUR two Windows Servers to be your DNS servers, and put
THEIR IP addresses in for DNS, as well as the other two we had in already. 4 Default Gateway: 192.168.1.1
|
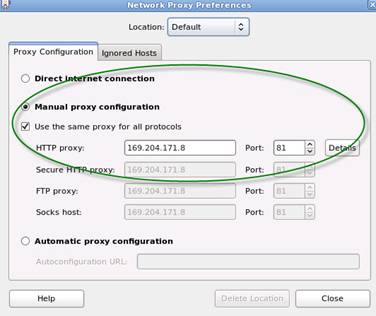
Note:
You must have your proxy turned OFF on your machine or it won’t work. Yeah,
fought with that for two days until I had a duh moment. |
|

Questions
- What
is a daemon?
- What
is the name of the apache daemon?
- Where
can you change your IP address?
- Why
must a webserver have a static IP address?
- What
is the IP address of your Linux server?
- What
command would you use to send 5 pings with a packet size of 64k?
- What
command do you send to set the graphics level to non-graphics mode, and
graphics mode and make sure httpd starts at
startup?
- What
is the difference between groupinstall and
install in Yum?
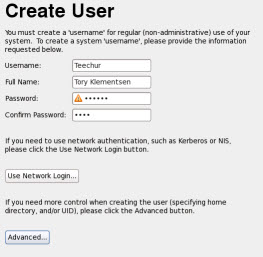
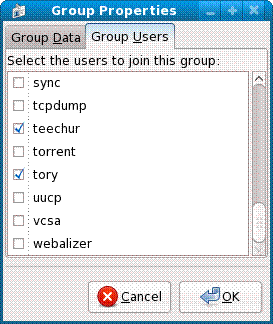
Lab L-4 Creating Users and Folder Permissions in Linux
In order to
allow regular users to create documents that save in the /var/www/html
folder you’re going to need to modify the permissions. This is a good place to
learn about permissions in Linux.
|
Do this |
It’ll look like this |
||||||||||||||||||||
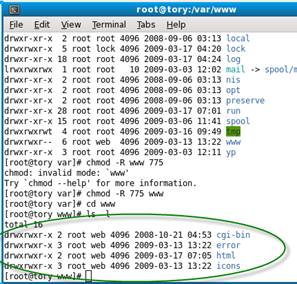
How
to: Change group ownership
Permissions
on files Below is an example of how a file may be
listed when typing ( ls -l
) at the prompt as well as information on how to interpret it. -rw-rw-r-- 1 hope
web 123 Feb 03 15:36 file.txt
To
change modes (chmod) use the following numbers.
This seems hard, but it’s really not: CHMOD can also to attributed by using
Numeric Permissions: 400 read by owner So if
you want to change the mode of a file named fred so
that the owner can read, write, and execute you add together the read (4) the
write (2) and the execute (1) = 7 so the command would be Chmod 7 fred Or to
make it easy 7=rwx 6=rw- 5=r-x 4=r-- 3=-wx (which would be strange) 2=-w- 1=--x 0=deny
all So if
I want to the folder, HTML owner=RWX, Group=RWX, and everyone else=R— I
would type the command chmod 774 html Alternative
I can do one type at a time. So if I wanted the owner to be RWX I could type Chmod u=rwx html That
sets the first set. Then I could do chmod g=rwx html and finally o=r |
Oops! It won’t let me
put a space in, so we’ll just say web.
|
||||||||||||||||||||
|
|
||||||||||||||||||||
|
Before you do this…ask
yourself “What numbers do I use to change the folder permissions in one
command?”
|


Lab L-5 Linux Basics : First Steps Into Linux
By Aarjav
Trivedi <aarjavtNOSPAM@yahoo.com>
Posted: ( 2002-02-04 14:35:18 EST by prakash )
For Linux newbies
a quick lesson on every day Linux commands.
Welcome!
We meet again. It has been some time now since I've heard you swear at your
computer so I assume your Linux installation went well and you have been
experimenting with your new system However If you are one of those wanderers
who ever so often chance upon random webpages on the
net, here you
will find a detailed guide to installing Linux.
Now
during installation you chose a 'root'
password which you used to login when you were prompted for a username and a
password for the first time. 'Root'
on Linux is the centre of all power. He is the System Administrator who has
access to all files and folder and can add or delete users or change their
passwords.
Now
absolute power can corrupt absolutely. For eg. If you put in a virus infected floppy as Root,
(Not that there are many viruses for Linux, as of now I have come across just
two) the virus might be able to infect all files, since you have access to all
of them. Users other than root however have write access to a limited part of
the file-system which often excludes crucial library and configuration files
thus reducing the risk of damage due to such incidents. So you must create a
new user for yourself and when not performing administrative tasks should log
in using that username rather than root.
Lets create a new user.
First
open the Linux Console which is found on the Panel at the bottom of your screen
generally shown by an icon that looks like TV switched off with a black screen.
The following commands are to be type in the console, pressing enter after you
have entered the full command. For us we will go under ApplicationsàSystemàTerminal
The
'useradd' Command
The
general syntax for the useradd command is :
useradd
-d home_directory -e expire_date
-g initial_group -p password login_name
home_directory : Is the main directory within
which the user is expected to story all his files and subdirectories.
For a user named 'foo' the home directory generally
is /home/foo
expire_date : This is the date on which the user's account expires and
he/she cannot access the computer
anymore unless the account is renewed. This is somewhat similar to your ISP
account
expiring in 6 months or one year. The expire date is in yyyy-mm-dd format (2002-0L-30)
initial_group : Every user in Linux belongs to a
group which affects his file permissions. The initial group
must be a group which already exists.
Password : This will be the user's password to access
his account
login_name : This will be the user name with which the
user will access his account.
Eg :
useradd
-d /home/einstein -e 2002-0L-30 -g root -p relativitysucks einstein
creates a user named einstein
on my computer.
His
home directory is /home/einstein
His expirty date is 30th august
2002
He belongs to the 'root' group
His password is relativitysucks
His username is einstein.
Incase you do not enter one of the parameters group, home, expire or shell they
are replaced by their default values. These default values can be viewed using
the " useradd -D" command
and can also be changed which however we will cover in a later document.
The
ls command
The ls command is equivalent of the DOS dir command.
It lists the files and subdirectories contained within the present directory.
Some
possible flags which can be used with the ls command are :
ls
-a
List
all files (Some configuration files starting with a dot '.' are otherwise not
listed). Often the number of files in a directory is too large to be fitted
within one screenfull of data. In such a case we use
dir/p for DOS. For linux a similar command is
ls | more
Lists
files and directories page after page on keystroke. The above command actually
is a combination of two commands. It introduces a new concept called 'Piping'.
It is done using the logical OR or | character found
just above the Enter key on your keyboard. In Linux it is possible to give the
output of one command to another command as an input.The
ls command lists files & subdirectories and the
more commands divides its input into page length views. Thus piping the ls output to more results in page length views of files and
subdirectories.
ls
-R
It lists the files and
subdirectories of a directory and further lists the contents of each
subdirectory recursively. The output of this command is usually large and is best
seen when piped through more.
The
pwd command
The
pwd or the present working directory command gives
you the path to the directory in which you presently are. It is used without
flags simply as 'pwd'
The
su command
Many
a times you might have logged in as a normal used and might need to be root to
install a software or for some other small task. You could logout then login as
root complete the work logout and login back as a normal user. Instead, you can
just use the su command. The format is :
su
username
eg : su
root
when you 'su'
to become root from a normal user, you are asked for the root password. But if
you are root, you can use 'su' to become any user
without using a password. Once your work is finished, use 'exit' to become
yourself.
The
whoami command
Sorry
folks! This command won't solve your teenage identity crisis but it will tell
you which user you are logged in as. Useful when you have used 'su' many times and now don't know who you are.
The
cp command
This
one copies files / directories from one place to another it's
syntax is
cp source_file_with_path
destination_path
eg : cp /home/aarjav/secret.txt
/ftp/pub
This
would make all my secrets public :). But my secrets wouldn't fit on my 8.4 Gb hard-disk ;) The cp command can
be used with some useful flags also :
cp -i
Interactive copying, prompts
before overwriting files or directories
cp -l source_file_with_path
destination_path
Makes a link (shortcut) to the source_file at the destination path instead of actually
copying it there.
cp -p
Preserve
file attributes while copying if possible
cp -R
Copy
Recursively . Used when copying directories. This
command also copies the contents of the subdirectories.
cp -u
Update
i.e. Copy only if the source file is newer than the destination file or the
destination file does not exist.
The
rm command
The
rm command is used to remove or delete files or
directories. Its general format is:
rm
-flag file_or_directory_with_path
eg : rm
/home/aarjav/waste.txt
Some
flags which can be used with the rm command are
rm
-v file.txt
Remove
verbosely, explain what is being done.
rm
-r my_directory
Remove
the directory and its contents recursively.
The
mkdir command
This
command is used to create new a new directory. Its syntax is
mkdir
-optional_flag directory_name
The
possible flags are
mkdir
-v directory_name
Tell what is going on.
mkdir
-p directory_with_path
This
is a cool command. Suppose you need a directory named SEIT within another
directory called PVPP in /usr/local and the parent
directory PVPP itself does not exist, then you can use :
mkdir
-p /usr/local/PVPP/SEIT
This
command creates the PVPP directory and the SEIT subdirectory in one go.
The
man command
For
someone new to linux, the man command is one of the
most important commands. The syntax is:
man command_name
Suppose
you have not understood fully one of the above commands or want to find out
about a new command you have learnt , the man command
provides a manual for that command
Thus
man cp
will show you a manual on the cp
command and so on.
I
think that is enough material to keep you busy for a few hours and get you
through some of the elementary tasks in Linux. So farewell friends, until we
meet again.
© Aarjav
Trivedi 2001
The
author grants you express permission to store, copy and republish this article
in electronic or hardcopy form
as long as its contents including
this instruction are not changed.
This
document prepared in Linux using StarOffice 5.1
I
would appreciate if some one using this article on their site or somewhere else
would drop me a mail.
<
a href=\"http://www.freeos.com/articles/3896/\">Linux
demystified
|
Do this |
It’ll
look like this |
|
Create a New User
|
|
|
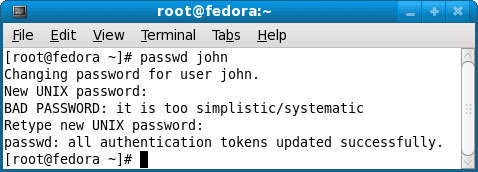
Change the user password
|
|
|
Moving around directories
|
What do you see?? |
|
What do you see?? |
http://floppix.ccai.com/ls.html |
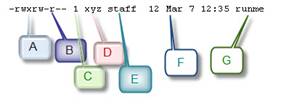
Rw = ____________________ R= _____________________ Drwx =______________________ Xr=_____________________ 1 (or 2 or 3) ___________________ Root root
_______________________ (note that root is a user here as well as a group…a
lot like administrator is part of the administrators group) |
|
|
|
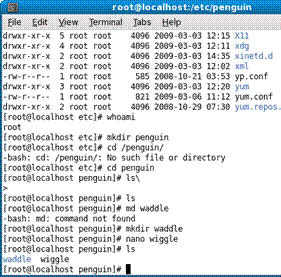
Who are you? |
a.
Change directory to the root. b.
Create a directory named Penguin c.
Move into penguin d.
Create a directory named waddle e.
Move into waddle f.
Create a FILE named wiggle. a.
At the prompt type nano
waddle (nano is a text editor) b.
Type Hi! I have wiggle in my waddle! c.
Notice the bottom of the screen has things like ^X
etc. If you select ^X it’ll exit. d.
Do you want to save? Yes. Keep the name wiggle. g.
List the directory contents. You should see waddle
and wiggle. Why is waddle blue?
|
|
|
Answer here |
|
|
|
|
|
|
|
What happened? What does cp –l mean? (to scroll down hit page
down) |


Questions
- What command did you use to
change group membership of html to web?
- What command did you use to
change the permissions on the html folder?
- What was the purpose of denying
permissions to everyone for the intranet folder?
- So if some schmoe
on the interwebs goes into the intranet directory
and starts poking around, what can he do?
- What is the numerical (octal)
representation of owner and group rwx, everyone
deny all?
Lab L-6 Creating a Website
Let’s build a
website. You’re going to create a project and put it on your website.
|
Do this |
It’ll look like this |
|
|
|
<html> <head> <title>My happy
little website</title> </head> <body> Hello World! </body> </html> |
|
<a href=”test.html”>Testing a link</a><br> <a href=”test2.html”>Testing another link</a> |
|
Have me check off your highly
effective and wonderful site before you go onto step 18. |
|
|
|
Uncheck when you save
“ask when not saving in ODF format” |
|
|

Questions
- What
are two programs you can use to create a website?
- Why do
you have to log in as a super user to save to the html folder?
- What
groups are you currently a member of?
- What
is gedit?
- What
is openoffice.org?
- What
is the html code for creating a link that says “Hot Dawg”
and links to http://www.hotdawg.com?
- Why
use OpenOffice over Gedit?
- Why
learn a little HTML, when you have OpenOffice
and other graphical programs available for creating websites?