Lab 7-3 Export and Import Power Settings
|
Check |
Task |
|
|
Export power plan to desktop |
|
|
Delete old plan |
|
|
Import plan |
|
|
Answer questions |
Your company has 100 laptops and you want to set them all to a specific power setting, and then lock them so they can’t be changed. (There are security reasons to do this that we’ll get into later.) Rather than going to each computer and manually setting the plan, you can create a plan on one computer, export it, then import it on the other computers either manually or through a script.
NOTE: You must have done the first two labs for this lab to work.
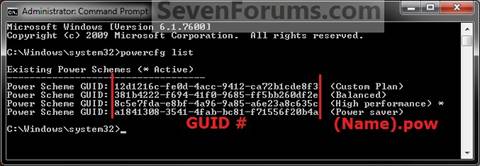
List all current power plans
|
1. Log into Windows 7 2. Open your command prompt elevated (see last lab if you don’t remember how). 3. At the command prompt type powercfg list 4. Press enter 5. You will see: a. The GUID (Globally Unique Identifier is the ID number for each “container” in a computer) b. Name of plan c. You should see one that is yourname.pow. That’s the one we’re going to export. |
Yeah…you have to type that ENTIRE GUID
number, but you can try this. ·
Highlight the
GUID of YOUR power plan you created by clicking and dragging with the left
mouse button. ·
Hit the ENTER
key. It is now copied to the clipboard (in Win Vista and 7) When you’re ready to paste, type POWERCFG –EXPORT and right clickàpaste |
|
6. The syntax of this command is POWERCFG –EXPORT whereyou’regoingtosavtheplan\nameofplan.pow GUID 7. Save your custom plan you created as your name (firstname.pow) on your desktop. 8. Check your desktop to make sure it’s there. |
So if I were doing the custom plan
above I would type Powercfg –export %userprofile%\Desktop\tory.pow
11eb7d0f-207d-455e-b86b-f0de0122ba90 |
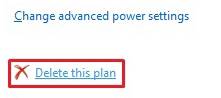
Delete a Power Plan using the GUI
|
9. Log into Windows 7 10. Go into power options. 11. Select “Balanced Plan” (or any other plan than your custom one). 12. Next to your custom plan click “Change plan settings” 13. Go into the plan and down below Change advanced power settings, click Delete this plan. 14. Sayonara plan! We loved you! |
|
Import a Power Plan
|
1. Log into Windows 7 2. Elevate your command prompt. 3.
Use the syntax POWERCFG –IMPORT %userprofile%\desktop\yourname.pow 4. (Remember how you saved your plan with your first name, make sure that you name it that.) 5. It should say “Imported power plan successfully.” |
Go into your power control panel and
check to see that this setting is there. Answer questions Have me check off your lab. |
Questions:
1. What does %userprofile%\desktop mean?
2. What is a GUID?
3. How does exporting power plans save an administrator time?