Lab 1-3 Installing Windows Virtual PC 2007
Objectives:
P Install
Virtual PC on a Windows XP System
P Note:
You may also use Virtual Box, which tends to run a little better. Instructions
are very similar.
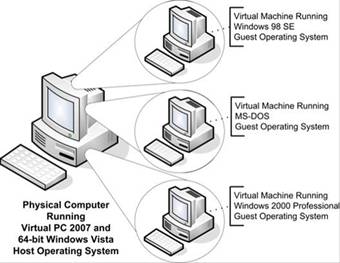
The purpose of Virtual PC is to allow businesses or
individuals to run different operating systems together. The benefit of Virtual
PC over a multi-boot system is that you can switch among the operating systems
without having to reboot the machine! Very cool!
In order to install Virtual PC your computer must meet the
following requirements. Make a note of how your computer relates to each
requirement.
|
Requirement
|
My computer in comparison
|
|
400 Mhz Processor with L2 Cache (1 GHz is recommended)
|
|
|
CD ROM or DVD
Drive
|
|
|
Super VGA or higher video
|
|
|
Keyboard and mouse
|
|
|
You can install on
any of the following operating systems. The system you install on is called
the Host System.
- Microsoft Vista Business
- Microsoft Vista Enterprise
- Microsoft Vista Ultimate
- Microsoft Windows XP Professional
- Microsoft XP Tablet PC Edition
|
|
The other operating systems you’re going to install are
called Guest Operating Systems. The
following table has the requirements for each of these systems:
|
Guest Operating System
|
Minimum Memory
|
Minimum Hard-Disk Space
|
|
Windows 98
|
64 MB
|
500 MB
|
|
Windows ME
|
96 MB
|
2 GB
|
|
Windows 2000 Professional
|
96 MB
|
2 GB
|
|
Windows XP Home
|
128 MB
|
2 GB
|
|
Windows XP Professional
|
128 MB
|
2 GB
|
|
Windows Vista
Business
|
512 MB
|
15 GB
|
|
Windows Vista Enterprise
|
512 MB
|
15 GB
|
|
Windows Vista
Ultimate
|
512 MB
|
15 GB
|
|
OS/2
|
64 MB
|
500 MB
|
These are minimums. If you were using the system for
production, you’d need a lot more. Add at least 1000 MB to each partition so
you can install programs!
|
Task
|
Shot
|
- Get a
copy of Virtual PC 2007 from \\csn\public\software
and install it on your LAB computer. Alternatively you can download it
from Microsoft’s website. It is FREE so you can use this at home with no
fear of Bill showing up at your door with his entourage.
- Run
the installer.
- Accept
the terms of the license agreement. Be sure to commit every word to
heart. Consider having it tattooed on your chest.
- Enter
your customer information and let it work for anyone who logs into the
computer.
- Click
install.
- Watch
it install. Stare intently at the screen. Do not take your eyes off the
screen.
- Click
finish.
- Pat
yourself on the back. You have now installed Virtual PC 2007!
|
|
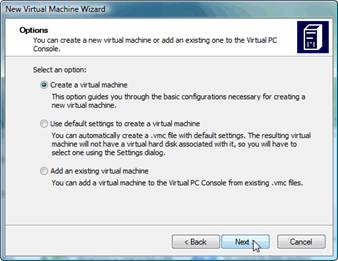
- Create
a new virtual machine.
- Start
Microsoft Virtual PC
- The
New Virtual Machine wizard should appear. If it doesn’t, Click the new
button. Click next.
- Select
Create a Virtual Machine and
click next.
- The
first Virtual Machine we’ll create is for DOS.
- Where
it says name and location, go to the second partition you created
(should be D: or E). If it hasn’t formatted, format a quick format
FAT32.
- Create
a folder named DOS and save the VMC (virtual machine file) into that
folder. Example: D:\DOS\DOS.vmc.)
- Note: When you create a virtual hard
drive in virtual PC, it will not initially take up all of the hard drive
space that you have. However, as you add more things to the virtual
drive, it will expand so you can’t just go nutso with the drive space
and the RAM.
|
|
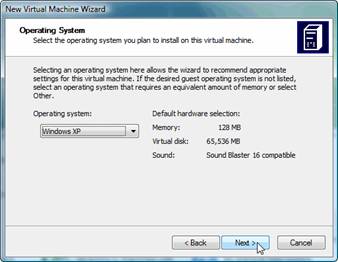
- In
the Operating System window select your guest operating system. Since
we’re doing DOS, select “Other”.
- It’s
going to try to guess how much RAM and drive space you’re going to need.
Just tell it you want less by clicking adjusting the RAM and dragging the bar to 64 MB
- In
the virtual hard disk window, click to select a New Virtual Hard Disk. Pur the Virtual Hard disk on your
ORIGINAL drive (C:\) in a folder named DOS. Name is DOS Hard Disk.vhd
(vhd stands for virtual hard drive) Example: C:\DOS\Dos hard disk.vhd)
- Click
Next and you’re done. Note that the drive is NOT a fixed size at this
point. It should be about 16 MB and it will grow as needed.
- Click
done! Your new Virtual Machine is ready to boot! It’s like having a
“pretend computer” within your computer. You can now install an
operating system!
- Have
me check this off!
|
|