Lab 5-7 Creating a REAL Windows 98 ERD
As you probably know, both
Windows 95 and Windows 98 allow you to create an emergency repair disk (ERD).
However, if you've ever looked at the contents of this disk, you may have
questioned its ability to help you out of a jam. For example, in some versions
of Windows 95, this disk contains nothing more than the files necessary for
booting to a DOS prompt from the disk. Although subsequent releases of Windows
95 and Windows 98 include more files on the ERD, you're still better off
creating your own repair disk. In this article, we'll show you how to make a
truly effective emergency repair disk.
What should an ERD be able to do?
Ideally, a good ERD should be
able to recover any PC from any crash. However, such versatility is impossible
because of limited disk capacity, and because it's impossible to predict every
potential problem. Therefore, you need to make the best possible use of the
space you do have on the disk. To do so, it helps to make a list of the
main functionality you hope to gain from your ERD. Such a list may contain
things like the following.
Bootable
Since the entire purpose of
an ERD is to repair Windows, you must assume when you create the disk that
Windows doesn't work. Therefore, it's important to make the disk bootable so
that you can access the hard disk of a damaged computer via a DOS prompt.
Access CD-ROM drives
As you probably know, you
can't access a CD-ROM drive through DOS unless you've loaded drivers for the
CD-ROM drive. Because virtually all software ships on CD-ROM, it's extremely
important for your ERD to be able to access your CD-ROM drive. You should also
keep in mind that you'll probably be using this disk in a variety of PCs.
Therefore, if possible, it's a good idea to set up a multiboot
environment on your disk that allows you to use a menu to load the driver for
any CD-ROM drive in your organization. Doing so isn't as difficult as you might
think; we'll show you how to do this later on.
Repair a damaged hard disk
Because corrupted files cause
many Windows problems, you should consider making a disk that's capable of
scanning your hard disk for damaged files and directories.
Maintain files and disks
Because you'll be working in
a DOS environment when using your ERD, it's especially helpful to include files
for maintaining your hard disk and files for maintaining individual files.
Although many commands such as COPY and ERASE are built into DOS, other, more
powerful commands aren't. Later on, we'll show you which of these files you
should include on your disk and why.
Edit text files
Some of Windows' most
critical files are text based. When there's a problem with Windows, you need to
be able to make changes to files such as Config.sys, Autoexec.bat, System.ini,
Win.ini, and other configuration files. Making these changes is virtually
impossible without a text editor. Therefore, it's important to include a text
editor on your ERD.
Our disk
So far, we've given you a
general explanation of what functionality you should include in your ERD. Now
it's time to go over the specifics of creating such a disk.
Making the disk bootable
To begin making your ERD,
boot your computer in the usual manner and open an MS-DOS Prompt window. Next,
insert a blank disk and type the command FORMAT A: /S
Doing so will create a
bootable floppy disk.
Adding the CD-ROM driver
Once you've made a bootable
disk, you need to add the CD-ROM drivers to it. If you look at your computer's
Config.sys file, you should see a command similar to the following:
DEVICE=C:\CDROM\D011V110.SYS /D:MSCD0000
Because this command varies
from computer to computer, yours may be slightly different. To add CD-ROM
drivers to your ERD, copy your Config.sys file to the floppy disk. Now, edit
the Config.sys file on your disk and remove each command except for the CD-ROM
driver command. Then, change the path of the device driver from the C drive to
the root directory of the A drive. For example, if your original CD-ROM driver
command looked like our earlier example, you'd change it to
DEVICE=A:\D011V110.SYS /D:MSCD0000
Now, copy the file specified
in your CD-ROM driver command from its original location on your hard disk to
the root directory of the disk you're creating. For example, if your original command
was the one we've been using, you'd copy the file D011v110.sys from C:\Cdrom to
A:\.
The device driver is only
half of the necessary CD-ROM files. Normally, Windows automatically loads
another file to make the CD-ROM drive functional. However, in DOS you must
manually load a similar file. To do so, copy the file Mscdex.exe from the
\Windows\Command directory to your ERD's root directory. Next, create an
Autoexec.bat file on your disk. Your Autoexec.bat file should contain a command
similar to the following:
A:\MSCDEX /D:MSCD0000
The A:\MSCDEX portion of this
command will work for all computers. The /D:MSCD0000
portion of the command will vary depending on your device driver. Notice that
part of our device driver command contains /D:MSCD0000.
Whatever your device driver command contains in this location, you'll attach to
the end of your MSCDEX command. For example, if your Config.sys file contains
the following command, you'd use the command below it in Autoexec.bat:
DEVICE=A:\BPCDDRV.SYS /D:BPCDDRV$A:\MSCDEX /D:BPCDDRV$
Next, reboot your computer
with the ERD and make sure you can access your CD-ROM drive. As we mentioned
earlier, it's helpful to have your disk contain drivers for each type of CD-ROM
drive in your company. For example, in Figure A, you can see that our
disk boots to a menu we can use to select the driver that we want to use for
the CD-ROM drive.
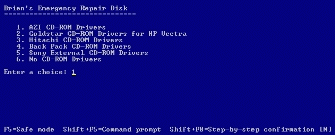
Figure
A: This menu lets us select the CD-ROM driver that our ERD will load.
Although creating such a menu
may seem complex, it's actually quite simple. DOS has all of the menu commands
built in—you need only make Config.sys and Autoexec.bat files that use this
built-in functionality. Below is a sample Config.sys file. You can use our
sample file to create your own multiboot environment.
Sample Config.sys
[MENU]MENUCOLOR=15,1MENUITEM=AZ, AZI CD-ROM DriversMENUITEM=HP, Goldstar CD-ROM Drivers for HP VectraMENUITEM=MC, Hitachi MENUITEM=BP, Back Pack CD-ROM DriversMENUITEM=SY, Sony External CD-ROM DriversMENUITEM=NN, No CD-ROM Drivers [COMMON]device=himem.sys
device=drvspace.sys
[AZ]REM AZI CD-ROM DriversDEVICEHIGH=a:\SGIDECD.SYS /D:MSCD000 [HP]rem The following line is for the HP Vectra
DEVICEHIGH=a:\gscdrom.SYS /D:MSCD000 [MC]REM Standard Hitache CD-ROM DriversDEVICEHIGH=a:\d011v110.SYS /D:MSCD000 [BP]rem the following line is for the backpack CD-ROM
device=a:\bpcddrv.sys /d:bpcddrv$
[SY]rem the following line is for the external Sony CD-ROM
DEVICE=SLCD.SYS /D:SONY_000 /B:340 /M:P /V /C /E:2 [NN]rem No CD-ROM Drivers
Notice the MENUITEM commands
at the beginning of the file. Each menu item contains two initials followed by
a description that will appear on the actual menu. When the user selects a menu
choice, the Config.sys file will process all instructions in the [COMMON]
section and all instructions in the section whose initials match those
specified in the MENUITEM command.
The Autoexec.bat file works
in a similar manner. DOS processes the commands at the beginning of the
Autoexec.bat file. When DOS reaches the GOTO %CONFIG% command, it causes the
command interpreter to skip to the section of Autoexec.bat that matches the
initials specified in Config.sys's MENUITEM command.
Here is a sample Autoexec.bat file:
Sample Autoexec.bat
@echo offprompt $p$g
path=a:\;c:\windows\command;c:\windows
GOTO %CONFIG% :AZ
REM AZI CD-ROM Drivermscdex /d:mscd000
GOTO END :HP
REM Goldstar CD-ROM Driver for HP Vectramscdex /d:mscd000
GOTO END :MC
REM Hitachi mscdex /d:mscd000
GOTO END :BP
REM Back Pack CD-ROM DriverMSCDEX /D:BPCDDRV$GOTO END :SY
REM Sony CD-ROM DriverMSCDEX /D:SONY_000GOTO END :NN
REM No CD-ROM DriverGOTO END :END
Rem End of file
Other files to add to your disk
When you have your CD-ROM
driver or drivers working, you should add several other files to your ERD.
Below is a list of these files and the reason for including them. Unless we've
specified otherwise, each of these commands are available in the
\Windows\Command directory.
Sys.com
The Sys.com command allows
you to make any floppy disk or hard disk bootable. For example, if you were
working on a computer whose boot sector had been destroyed by a virus, you
might run the command SYS C: to add the Io.sys, Msdos.sys, and Command.com
files to the hard disk.
Attrib.exe
The Attrib.exe program is
critical for working with three types of files in a DOS environment. By
following the ATTRIB command with a filename, a plus or minus sign, and the
letter H, R, or S, you can add or remove the hidden,
read-only, and system attributes, respectively from a file. For example, if you
wanted to make every file in your current directory visible, you could type
this command to remove the hidden attribute: ATTRIB *.* -h
To hide a visible file, you'd
change the minus sign after the file name to a plus.
Mem.exe
The Mem.exe command is useful
for viewing what's currently loaded in memory. To use this
command, simply type MEM /C.
XCOPY*.*
XCOPY*.* includes all Xcopy and Xcopy32 files. The XCOPY command works exactly
like the COPY command. However, you can add the /S switch to copy
subdirectories, while the COPY command can copy only the current directory. For
example, if you wanted to copy the current directory and all of its
subdirectories to the D drive, you'd type XCOPY *.* /S D:
Deltree.exe
If you've ever tried to
delete a large directory structure from the DOS prompt, you know how tedious it
can be. You must remove the contents of each subdirectory individually before
you can erase the main directory. For example, suppose you had a directory
called Letters that contained the subdirectories A, B, and C. Using the normal
DOS commands, you'd have to type the following sequence of commands to remove
the Letters directory:
CD\LETTERS\AERASE *.*CD..
RD ACD BERASE *.* CD..
RD BCD CERASE *.*CD..
RD CERASE *.*CD..
RD LETTERS
This long sequence of
commands can be easily replaced by typing the simple command DELTREE LETTERS.
Needless to say, the DELTREE command is a big timesaver.
EDIT.*
The Edit files allow you to
use the MS-DOS EDIT program. The EDIT program is a text editor that you can use
to alter system files such as Config.sys, Autoexec.bat, and System.ini, to name
a few.
Chkdsk.exe
Although CHKDSK's repair
capabilities are obsolete, using the CHKDSK command is still the quickest
method in a DOS environment to check your hard disk size and remaining free
space. To do so, simply type CHKDSK followed by the letter of the drive
you want to check.
Format.com
The FORMAT command is useful
for formatting blank floppies. You can also use it to reformat a damaged hard
disk.
Diskcopy.com
The DISKCOPY command
duplicates a floppy disk. To use this command, type DISKCOPY followed by
the source drive and the destination drive. For example, you might type
DISKCOPY A: A:
Extract.ext
If you've ever looked at the
contents of your Windows CD, you probably know that all the files that make up
Windows are stored in a compressed format within CAB files. If you need to
replace a damaged Windows file, you can use the EXTRACT command to decompress
the file you need. For detailed instructions on using this utility, type EXTRACT
/?.
Mode.com
Occasionally, a problem may
result in your not being able to read the screen. If this happens to you, you
can use the mode command to return the screen to a readable state. For example,
to view a standard DOS format screen you'd type MODE CO80.
Scandisk.exe
If you've used Windows for
any time at all, you're probably already familiar with the Scandisk utility.
Scandisk allows you to correct hard disk problems.
Fdisk.exe
The FDISK command can be used
to repartition your hard disk. You should be cautious when using FDISK, because
once you delete a partition, you can't recover it through conventional means.
Doskey.com
The DOSKEY command allows you
to repeat commands you've already typed by pressing the up arrow. This shortcut
is especially handy if you're doing a complex procedure with a lot of
repetitive typing.
More.com
Using the MORE command causes
the computer to show you only one screen full of information at a time. For
example, suppose you have a long text file called Readme.txt. If you type the
command TYPE README.TXT the computer will display the file too quickly
to read. However, typing TYPE README.TXT |MORE will cause the computer
to display the file while pausing after each screen full of information.
Himem.sys
You may have noticed that we
used the Himem.sys command in Config.sys. We did this to load our CD-ROM
drivers into high memory and preserve precious conventional memory. You can use
Himem.sys to load a variety of drivers into high memory.
PKZIP and PKUNZIP
Many times, when trying to
repair a malfunctioning computer, you'll have to use a patch that's stored in
ZIP format. Under normal circumstances, you'd probably use a utility like
WinZip to decompress such a file. However, if Windows won't load, you won't be
able to use WinZip. PKZIP and PKUNZIP offer similar functionality to WinZip,
but they work in a DOS environment. You can download these utilities from http://www.pkware.com .
What
about XP and
Keep this disk for
your lab test! Now take the ERD quiz on Examview!
1. Create a Windows 98 emergency startup
disk.
2. Copy the cabinet file to a new
directory on the disk.
3. Get a printed list of the files in the
cabinet file.
4. Extract all files from the cabinet file
into the new directory.
5. Get a printed list of the files in the
new directory.
|
Requirement |
Completed
(10) |
Incomplete
(5) |
Not
attempted (0) |
|
Create a Windows 98 startup
disk |
|
|
|
|
Extracted cabinet files |
|
|
|
|
Created new directory |
|
|
|
|
List of files in the new
directory |
|
|
|
So…what is a cabinet file?