Lab 5-6 Create a Bootable USB
Flash Drive
- If you do not have a Flash drive, work with someone who does. I have some small ones, but they won’t help. It should be at least 512 MB
- Ensure your BIOS will allow booting from USB.
- Check the BIOS with the USB device plugged in.
- Sometimes it won’t show that option unless you have a USB on the system, plugged in.
- Go to www.nu2.nu/pebuilder to download BartPE and PE Builder.
- Make sure you have the following:
- Windows XP CD-ROM with SP1 or higher
- Flash drive that is at least 512 MB that is clean (nothing on it).
- Server 2003 SP1. This is available at \\csn\pub\software. We need two files that are on the SP1 CD.
- Download PEBuilder
- Start pebuilder.exe
- Agree with the license
Extract Files from
Server 2003 SP1
- Go to the software folder on CSN\pub and copy Service Pack 1 over to your hard drive.
- Create a folder named WS-SP1 and put the file here drive to make it easy.
- Rename it WS-SP1.exe
- Open the command prompt and navigate to c:\WS-SP1
- Type the command WS-SP1.exe –x (x=extract…we’re going to extract some files)
- A dialog box will ask you to choose a directory to extract the files to. It should be your current directory (c:\WS-SP1)
- Click OK. It’ll extract the files to this folder.
- A bunch of files will be loaded into this directory. Find Windows6.0-kb936330-X86.zip
- Open this folder (it should open as a compressed folder)
- Move the file Ramdisk.sys into the c:\pebuilder3110a\srsp1 (create the srsp1 folder if needed).
*************************************
- Copy this setupldr.bin file to the srsp1 folder by typing
Copy setupldr.bin c:\pebuilder3110a\srsp1
- Expand the ramdisk.sy_ file to the SRSP1 folder by typing:
Expand –r ramdisk.sy_ c:\pebuilder3110a\srsp1
************************************
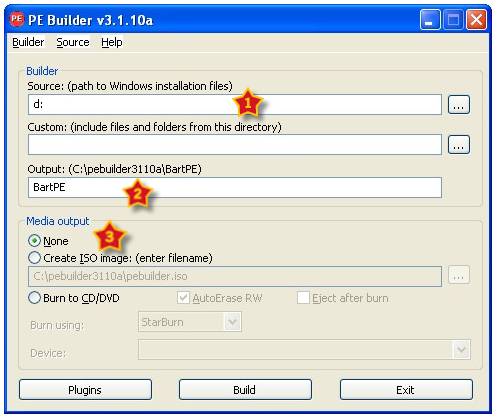
- Run the PEBuilder program (if it isn’t already running)
- Pop your Windows XP disk into the drive, or point to the ISO.
- Point to either the CD ROM drive or the ISO at source. (1)
- Make sure the output is c:\pebuilder3110a\BartPE. (2)
- Media output is none. (3)
- Click Build.
- Accept the creating of the directory.
- Agree (you’re clicking your life away, but don’t worry about it).
- It’ll do its thing. Watch.
- Oooh.
- Ahhh.
- Wait for it to finish before starting the next part.
Prepare your
- Now you need to prepare your USB drive for receiving the image. Plug it into a USB port.
- Note the drive letter it has been assigned. Let’s say it got letter F:
- Open the command prompt.
- Navigate you way to the folder that contains BartPE. (It should be c:\pebuilder3110a)
- Type pe2usb –f f: (as long as f: is your drive letter)
Answer the following questions.
- What control panel do you access to create a boot recovery disk in 98?
- List the files on the recovery disk below.
- What options are you given when you boot using this disk?
- What is the purpose of a recovery disk?
- Do you
need a boot disk for
- Why or why not?
Creating a
- Boot into
- Get a USB key or USB flash drive. Depending on your need such as data storage or want to put in a lot of custom scripts or applications, it’s better to buy a USB memory key with at least 512 MB in size.
- Download and install the Windows Automated Installation Kit (Windows AIK) by going to http://tinyurl.com/minint which also contains Windows PE 2.0. Alternately you can find it in \\csn\pub\software\Windows AIK
- Format USB flash drive from within XP.
- Open a command prompt and execute the following commands to create a partition (explanation in bracket, which should be ignored):
- Diskpart (text-mode command interpreter to manage objects such as disks, partitions, or volumes)
- list disk (displays a list of disks and information about them)
- select disk 1 (assuming the USD key is detected as disk 1 from the list generated by “list disk” command. This setting must be correct or else you may accidentally wipe out the hard disk instead.)
- clean (removes any and all partition or volume formatting from the disk with focus)
- create partition primary
- select partition 1 (the only primary partition created by command above)
- active
- format fs=fat32 (use FAT32 file system)
- assign (assigns a drive letter or mount point to the volume with focus)
- exit
- Setup and customize Windows PE by following below instructions:
- Click on Windows Start menu, open All Programs (if applicable), and then Windows AIK program folder. Select and click “Windows PE Tools Command Prompt”.
- Type the following command:
Run Copype.cmd x86 c:\winpe_x86
If you want to create a 64-bit version of bootable USB flash disk, change the architecture from x86 to amd64. You may want to change the name of the folder too.
- You can customize WinPE by copying any tools possible needed and available to the C:\winpe_x86\iso folder. The utilities may include imaging tools for capturing images such as imagex, wimscript.ini and etc.
- Insert the USB key disk into the machine where WinPE is installed.
- Run the following command in command prompt to copy WinPE and its contents to the USB flash drive:
xcopy c:\winpe_x86\iso\*.* /s /e /f e:\
c: and e: represents drive where the WinPE files are located and USB flash drive respectively. Change the drive letter if it’s not the same.